10 Must-Try Windows 10 Tricks for Beginners

Unleash the full potential of Windows 10 with these 10 must-try tricks that will revolutionize your computing experience!
Table of Contents
- Introduction: Becoming a Windows 10 Wizard!
- Let's Start with Start: Personalizing Your Start Menu
- Secret Passage to Programs: Using Search to Find Apps Quickly
- Magical Movements: Mastering Shortcut Keys
- Keeping Secrets Safe: The Art of Privacy Settings
- Time Traveling: Setting Up and Using System Restore
- Making Windows Talk: Exploring Narrator and Speech Recognition
- Keeping the Monsters Out: Updating Windows Defender
- Decorating Your Digital Castle: Changing Background and Themes
- Organizing Your Kingdom: File Explorer Tips
- Conclusion: You're Now a Wizard of Windows 10!
- FAQs: Answers to Your Curious Questions
Introduction: Becoming a Windows 10 Wizard!
Hey there, young explorers! Are you ready to become a wizard at using your computer? We're about to dive into some super cool tricks that'll make you a Windows 10 pro in no time! So, grab your magic wand (or in this case, your keyboard and mouse) and get ready to unlock the secrets of Windows 10. Let's embark on this exciting journey together!
Whether you're a beginner or have been using Windows for a while, these tips and tricks will help you enhance your Windows experience and become a master at navigating through your digital kingdom. From personalizing your Start Menu to mastering shortcut keys and exploring privacy settings, we've got you covered with everything you need to know to level up your computer skills. So, let's get started on this magical adventure and unleash the wizard within you!
Let's Start with Start: Personalizing Your Start Menu
Your Start Menu is like your own magical cupboard. Let's make it show all your favorite things!
Pinning Your Favorite Apps
Just like a fridge magnet, learn how to stick your favorite apps to the Start Menu!
Changing Colors and Sizes
Make your Start Menu yours by changing its colors and the size of the tiles!
Secret Passage to Programs: Using Search to Find Apps Quickly
Have you ever felt like you're on a treasure hunt to find your favorite apps on your computer? Well, what if I told you there's a secret passage that can lead you straight to them in no time! Let me show you how to use the Search feature on your Windows 10, just like a hidden pathway in a magical castle.
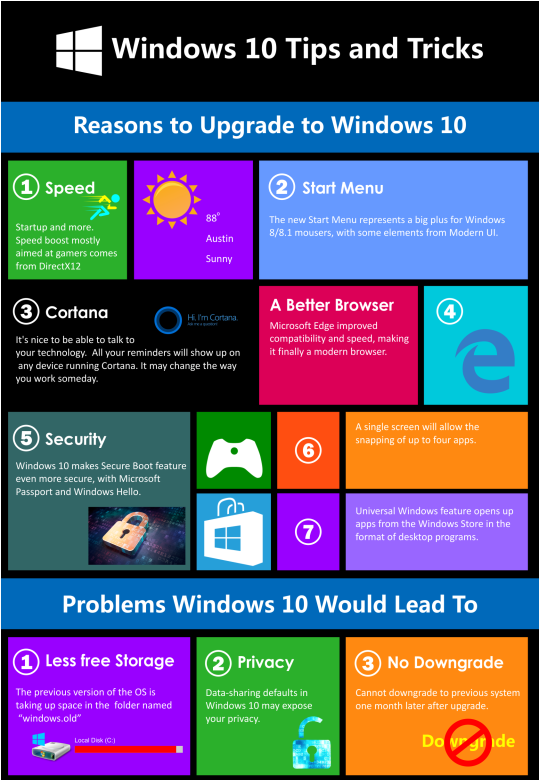
Image courtesy of www.infographicszone.com via Google Images
Searching for Apps and Files
Imagine you're in a castle with many rooms, each filled with different treasures. Instead of searching through every room to find what you need, you can simply cast a spell - or in this case, type some keywords into the search bar! Type the name of the app or file you're looking for, and like magic, Windows 10 will show you where to find it. It's like having a map to all the hidden gems on your computer!
Magical Movements: Mastering Shortcut Keys
Shortcut keys are like magic wands for your fingers. Wave them around and poof - things happen faster! Imagine having secret combinations that let you do cool things on your computer without even touching your mouse. It's like being a wizard casting spells with a flick of your hand!
Important Shortcut Combos
Now, let's learn some of the most important shortcut key combinations that will make you a Windows 10 pro in no time. These magical movements will save you time and make navigating your computer a breeze:
- Ctrl + C: Copy text or files like a copying spell.
- Ctrl + V: Paste copied text or files like a pasting charm.
- Ctrl + Z: Undo your last action like a time-turner.
- Ctrl + Shift + Esc: Open the Task Manager to manage your computer like a tech wizard.
- Windows Key + L: Lock your computer quickly like casting a privacy spell.
Practice these magical movements, and you'll soon be navigating Windows 10 like a seasoned sorcerer. Keep exploring and trying out new shortcuts to uncover even more hidden tricks up your sleeve!
Keeping Secrets Safe: The Art of Privacy Settings
Your computer has secrets, and I'll help you keep them safe! Let's lock down your Privacy settings together.

Image courtesy of vpnoverview.com via Google Images
Adjusting Privacy Options
I'll show you which buttons to click to make sure you're the only one who knows your computer's secrets.
Time Traveling: Setting Up and Using System Restore
Did something go wrong on your computer? Don't worry, we've got a magical tool called System Restore that can help you fix it! It's like having a time machine for your PC, allowing you to travel back to a time when everything was working perfectly. Let's learn how to set up and use System Restore to save the day!
Creating Restore Points
Imagine your computer as a brave adventurer, marking checkpoints along its journey. These checkpoints are called "Restore points," and they serve as snapshots of your computer's settings at a specific moment in time. Here's how you can create your own restore points:
1. Open the Control Panel by typing "Control Panel" in the Search bar on your taskbar.
2. Click on "System and Security."
3. Under the "System" section, click on "System."
4. On the left side, click on "System Protection."
5. Click on the "Create" button, give your restore point a descriptive name, and follow the on-screen instructions.
Now, your computer has marked a special spot that it can return to if things go awry. If you ever encounter an issue, you can use System Restore to travel back to this safe point in time, restoring your computer's settings to how they were when the restore point was created.
Making Windows Talk: Exploring Narrator and Speech Recognition
Your computer can do some pretty cool things with its voice! Let's dive into how you can make Windows talk and listen to you through Narrator and Speech Recognition.
| Trick | Description |
|---|---|
| 1 | Customizing the Start Menu |
| 2 | Virtual Desktops for Better Organization |
| 3 | Using Cortana for Voice Commands |
| 4 | Snapping Windows for Multitasking |
| 5 | Task View for Easy Navigation |
| 6 | Creating Shortcuts with Keyboard Shortcuts |
| 7 | Using the Magnifier Tool for Accessibility |
| 8 | Customizing Notification Center |
| 9 | Syncing Settings Across Devices |
| 10 | Security Features like Windows Defender |
Image courtesy of www.evalacademy.com via Google Images
Turning on Narrator
Imagine having your computer read out loud to you like a storyteller. With Narrator, you can have your computer talk to you and read what's on the screen. It's like having a friend who reads for you whenever you need it. Let me show you how to turn on this magical feature:
- Click on the Start button.
- Go to Settings.
- Click on Ease of Access.
- Turn on the switch under Use Narrator.
Setting Up Speech Recognition
Have you ever wished you could talk to your computer, and it would listen and respond? Well, with Speech Recognition, you can do just that! It's like having a magical assistant that follows your voice commands. Let's set it up together:
- Click on the Start button.
- Go to Settings.
- Click on Privacy.
- Under Speech, turn on the switch for Speech Recognition.
Keeping the Monsters Out: Updating Windows Defender
Just like knights protect castles from dragons, Windows Defender protects your computer from viruses and other bad monsters that try to sneak in. To make sure your computer is always safe, you need to keep Windows Defender strong by updating it regularly.
Checking for Updates
Updating your Windows Defender is like giving it a brand-new shield and sword to fight off any new monsters trying to attack your computer. Follow these steps to check for updates:
1. Click on the Start Menu and type "Windows Security" in the search bar.
2. Open the Windows Security app that appears in the search results.
3. Click on the "Virus & threat protection" option in the app menu.
4. Look for the "Check for updates" button and click on it.
5. If there are any updates available, click on "Download and install" to make sure Windows Defender is up to date and ready to protect your computer.
By keeping your Windows Defender updated, you can be sure that your computer is safe and secure from any online monsters trying to cause trouble. So, don't forget to check for updates regularly to keep your computer armor shiny and strong!
Decorating Your Digital Castle: Changing Background and Themes
Want to make your computer look cool? Add some style to it with Backgrounds and themes! Just like decorating your room with posters and stickers, you can personalize your digital castle to reflect your personality.

Image courtesy of www.edrawsoft.com via Google Images
Choosing a New Background
When you turn on your computer, the first thing you see is the background or wallpaper. It's like the painting on the wall of your digital castle. To change it, right-click on the desktop, select "Personalize," and then choose "Background." From there, you can pick a picture from your computer's library or even use one from the internet. Select the picture you love the most, set it as your background, and voila! Your digital castle looks awesome!
Switching Themes
If you want to change the overall look and feel of your computer, you can switch themes. Think of themes as different styles of decorating your digital castle. To do this, go back to the "Personalize" settings, click on "Themes," and browse through the options. Each theme comes with its own backgrounds, colors, and sounds. Pick the one that fits your style the best and watch as your computer transforms into a whole new experience!
Organizing Your Kingdom: File Explorer Tips
Just like organizing your toys into different boxes, you can create folders and subfolders to keep your files in order on your computer. Imagine each folder as a separate box where you can store similar files together. For example, you can have a "School" folder with subfolders for each subject like Math, Science, and English. This way, finding your homework or projects will be a breeze!
Quick Access to Recent Files
Have you ever played a game and had to switch off your computer, only to struggle to find the game again the next time? Well, with Quick Access in File Explorer, you can jump right back into the files you were using just like continuing a paused game. This feature keeps track of the files you've recently opened, making it easy for you to find them again without searching through all your folders. It's like having a personal assistant who remembers everything you've been working on!
Conclusion: You're Now a Wizard of Windows 10!
Great job on going through all these cool Windows 10 tricks! You've unlocked the secrets to becoming a true wizard of Windows 10. Now, you're ready to dazzle your friends with your newfound computer skills!

Image courtesy of visme.co via Google Images
You've learned how to personalize your Start Menu, find apps quickly using the search feature like a secret passageway, and master shortcut keys that make things happen with a flick of your fingers. Your computer privacy is safe with the art of privacy settings and System Restore serves as your trusty time machine in case anything goes awry.
Exploring the wonders of Narrator and Speech Recognition have given your computer a voice, while updating Windows Defender ensures your digital fortress is secure from any monsters. You've even decorated your digital castle with backgrounds and themes, making it a reflection of your style.
By organizing your kingdom with File Explorer tips, you've become the ruler of your digital domain. With all these tricks up your sleeve, you're now a certified wizard of Windows 10!
So go ahead, practice your skills, and keep exploring the magical world of technology. You're well on your way to becoming a tech master!
FAQs: Answers to Your Curious Questions
How do I add my games to the Start Menu?
Adding your games to the Start Menu is super easy! Just follow these steps:
Step 1: Click on the Start button at the bottom left of your screen.
Step 2: Find the game you want to add in the list of apps.
Step 3: Right-click on the game icon.
Step 4: Select "Pin to Start" from the menu that appears.
Voila! Your game will now be pinned to the Start Menu for easy access.
Can I talk to my computer to write my homework?
Sure you can! Let me show you how to make your computer type for you.
Step 1: Open a document or a text editor like Microsoft Word.
Step 2: Click on the microphone icon in the toolbar.
Step 3: Start speaking, and your computer will magically turn your words into text!
Now you can dictate your homework instead of typing it all out. How cool is that?

