Active Directory: Setup Guide for Win 11

Unleash the power of Win 11 with our comprehensive Active Directory setup guide. Take control and streamline your system now!
Table of Contents
Introduction to Active Directory and Windows 11
Active Directory is like the superhero of networks for Windows 11 users. It helps in organizing and managing all the different users, computers, and resources in a network. Think of it as a master list that keeps everything in order and makes sure everyone has access to what they need.
For people using Windows 11, Active Directory is a powerful tool that simplifies the task of network management. With Active Directory, you can easily control who can access what in your network, set up security policies, and manage user accounts without breaking a sweat.
Microsoft Windows 11 users can benefit greatly from Active Directory, as it streamlines the process of network administration, making it more efficient and secure. Whether you're a tech enthusiast or just someone who wants their network to run smoothly, understanding Active Directory is crucial for getting the most out of your Windows 11 experience.
Preparing to Install Active Directory
Before you start setting up Active Directory on your Windows 11 Pro system, it's essential to ensure that your computer meets the Minimum system requirements. Active Directory requires specific hardware and software specifications to function correctly. Make sure to check that your system meets these requirements before proceeding with the installation process.
Obtaining Windows Server
In order to create a domain controller for Active Directory, you will need to obtain a copy of Windows Server. Windows Server is the operating system that will serve as the foundation for your Active Directory setup. You can acquire a copy of Windows Server from Microsoft's official website or through authorized retailers. Once you have obtained Windows Server, you will be ready to move on to the next steps in setting up Active Directory on your Windows 11 Pro machine.
Setting Up Windows Server for Active Directory
Before you can set up Active Directory on your Windows 11 Pro machine, you need to install Windows Server. Installing Windows Server is a straightforward process. Simply insert the installation media into your computer, boot from it, and follow the on-screen instructions. Make sure to select the appropriate options for your system configuration.
Image courtesy of www.edrawsoft.com via Google Images
Configuring Windows Server Settings
Once Windows Server is installed, you'll need to configure some settings to prepare it for Active Directory use. This includes setting up a static IP address, configuring DNS settings, and joining the server to the domain. These settings are crucial for the proper functioning of Active Directory on your Windows 11 Pro system.
Installing Active Directory on Windows 11 Pro
Are you ready to set up Active Directory on your Windows 11 Pro system? Follow these simple steps to install and configure Active Directory - a valuable tool for managing your network.
Using Server Manager
Before you begin, make sure you have Server Manager installed on your Windows 11 Pro machine. Server Manager is a management tool that allows you to install roles and features, including Active Directory.
To add the Active Directory Domain Services role, open Server Manager and navigate to the "Manage" menu. From there, select "Add Roles and Features" and follow the wizard to install the Active Directory Domain Services role.
Creating a New Domain
Once the Active Directory Domain Services role is installed, you can begin creating a new domain for your network. To do this, open Server Manager and select "Tools" followed by "Active Directory Users and Computers."
In the Active Directory Users and Computers window, right-click on the "Domain" folder and choose "New" > "Domain." Follow the wizard to set up your new domain, including specifying the domain name, NetBIOS name, and domain functional level.
Managing Your Active Directory
Once you have set up Active Directory on your Windows 11 system, it's essential to know how to manage users, computers, and policies within this powerful tool. Here are some tips to help you navigate and make the most out of Active Directory:
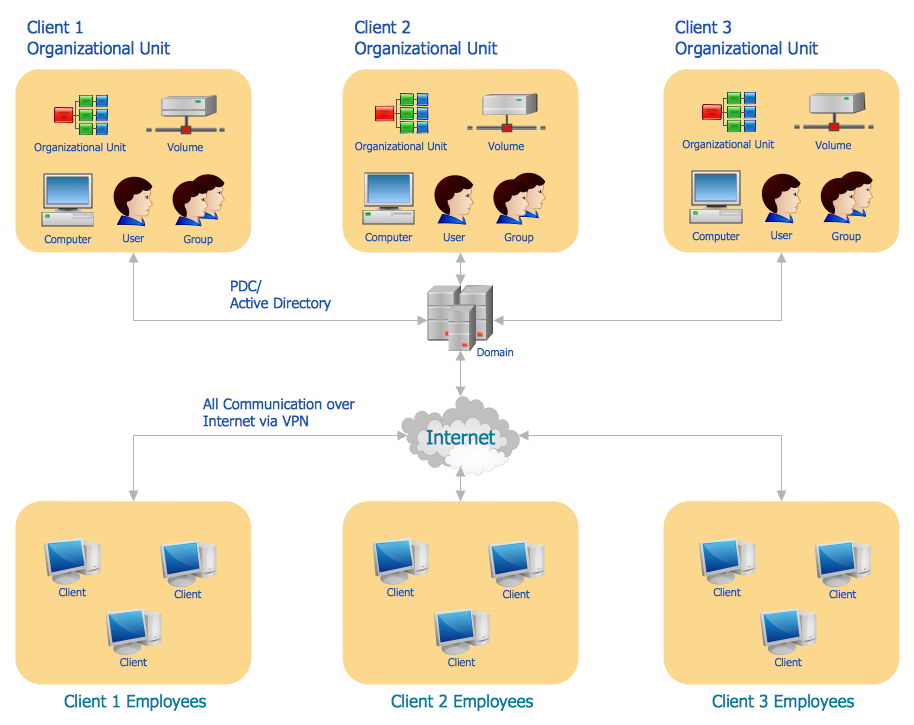
Image courtesy of www.conceptdraw.com via Google Images
Adding Users
Adding users to Active Directory is a straightforward process. You can create new user accounts and assign them specific roles and permissions within the network. This way, you can control who has access to what resources, ensuring better security for your network.
| Step | Description |
|---|---|
| 1 | Download and install the latest version of Active Directory Domain Services (AD DS) on your Windows 11 server. |
| 2 | Open Server Manager and click on "Add roles and features". Follow the wizard to add the Active Directory Domain Services role. |
| 3 | Once the role is installed, open Active Directory Users and Computers to create an Organizational Unit (OU) structure for your domain. |
| 4 | Create user accounts, groups, and computers within the OU structure to manage access and permissions. |
| 5 | Configure Group Policies to enforce security settings and configurations across your domain. |
| 6 | Set up DNS to ensure proper domain name resolution for your Active Directory environment. |
| 7 | Backup and regularly monitor your Active Directory environment to prevent data loss and ensure smooth operation. |
Setting Up Group Policies
Group policies in Active Directory allow you to enforce specific settings and restrictions across multiple users or computers. This can help streamline the management of your network by ensuring consistency in configurations. You can set policies related to security, software installation, desktop settings, and more.
By effectively managing users, computers, and group policies in Active Directory, you can maintain a secure and organized network environment for your Windows 11 system.
Conclusion
In conclusion, Active Directory is a powerful tool for managing networks in Windows 11. By setting up Active Directory on your Windows 11 Pro system, you can streamline user management, computer configurations, and group policies effectively. This centralized approach to network management can save time and improve overall system security.
Throughout this guide, we've covered the essential steps to prepare for and install Active Directory on your Windows 11 Pro machine. We discussed the system requirements, obtaining Windows Server, setting up Windows Server, installing Active Directory using Server Manager, creating a new domain, managing users, and setting up group policies. These steps are crucial in ensuring a smooth and efficient setup process.
Managing your Active Directory is key to maintaining a well-organized and secure network environment. By following the tips provided in this guide, you can easily add users, configure group policies, and ensure that your network runs smoothly.
Active Directory plays a vital role in network management for Windows 11 users. It simplifies administrative tasks, enhances security, and improves overall efficiency. By incorporating Active Directory into your Windows 11 Pro setup, you can take control of your network and ensure that it operates seamlessly.
FAQs (Frequently Asked Questions)
What is Active Directory and why do I need it for Windows 11?
Active Directory is a service provided by Microsoft that helps manage users, computers, and other devices in a networked environment. It is essential for Windows 11 users as it simplifies the process of accessing resources, sharing information, and maintaining security within the network.
What are the system requirements for setting up Active Directory on Windows 11?
Before installing Active Directory on Windows 11, it is important to ensure that your system meets the minimum requirements. This includes having a compatible version of Windows 11 Pro installed and sufficient hardware resources to support the Active Directory services without any performance issues.
How do I obtain Windows Server to create a domain controller for Active Directory on Windows 11?
To create a domain controller for Active Directory on Windows 11, you will need to obtain a copy of Windows Server. You can purchase a license for Windows Server from Microsoft or through authorized retailers. Once you have the installation media, you can proceed with setting up the domain controller on your Windows 11 system.
What are the basic steps for installing Windows Server to prepare for Active Directory setup?
Installing Windows Server as the foundation for Active Directory involves simple steps. You need to boot your computer from the Windows Server installation media, follow the on-screen instructions to set up Windows Server, and configure the necessary settings to prepare it for Active Directory use.
How can I add users to Active Directory after setting it up on Windows 11 Pro?
Adding users to Active Directory on Windows 11 Pro is a straightforward process. You can use the Active Directory Users and Computers tool to create new user accounts, assign them to specific groups, and manage their permissions within the networked environment.
What are group policies and how do I set them up in Active Directory on Windows 11?
Group policies in Active Directory allow you to manage and control the user environment by applying specific settings and restrictions. To set up group policies in Active Directory on Windows 11, you can use the Group Policy Management Console to create, edit, and deploy policies across your network.


