Boot Win 10 Pro via USB: A How-To Guide

Uncover the secrets to booting Win 10 Pro via USB in this comprehensive how-to guide. Don't miss out on this!
Table of Contents
Welcome to Windows 10 Booting
When we talk about booting Windows 10 Pro from a USB, we are referring to starting up your Windows PC using the operating system stored on a USB drive. This means that instead of using the usual system on your computer, you will be using the one from the USB. It's like having a portable version of Windows 10 Pro that you can take anywhere with you.
What Does it Mean to Boot Windows 10 Pro?
Booting Windows 10 Pro simply means starting up your computer using the Windows 10 Pro operating system that is stored on a USB drive. It's like switching to a different engine that makes your computer run differently.
Why Boot from USB?
There are several reasons why you might want to boot your computer from a USB with Windows 10 Pro. It can help you fix problems on your computer, install Windows 10 Pro on a brand new PC, or have a portable system that you can take with you wherever you go. It's like having a backup plan in case something goes wrong with your regular system.
Gathering the Essentials
Before you can start booting Windows 10 Pro from a USB drive, you need to gather a few essential items. Here's what you'll need:
What You Need Beforehand
First and foremost, you'll need a physical USB drive. This drive will act as the vehicle for carrying the Windows 10 Pro operating system to your computer. Make sure it has enough storage space to accommodate all the necessary files. Additionally, you'll need a working Windows PC to prepare the bootable USB drive. This PC will be used to download and set up the Windows 10 Pro software on the USB.
Getting the Windows 10 Pro Software
Now that you have your USB drive and a working Windows PC, it's time to acquire the Windows 10 Pro software. To do this legally, you can visit the Microsoft website and download the necessary system files. Make sure you follow the instructions provided on the website to ensure you're getting the correct version of Windows 10 Pro for your needs. Once you have downloaded the software, you're ready to move on to the next steps in creating your bootable USB drive.
Preparing the USB Drive
Before you can install Windows 10 Pro on your computer using a USB drive, you need to make sure that the USB is properly set up and ready for the installation process. In this section, we will guide you through the steps to prepare your USB drive so that it can boot Windows 10 Pro.

Image courtesy of support.onlogic.com via Google Images
Formatting Your USB Drive
Formatting your USB drive is the first step in preparing it for the installation of Windows 10 Pro. To do this, you will need to connect the USB drive to a working Windows PC. Once connected, you can right-click on the USB drive icon in File Explorer and select the 'Format' option. Make sure to choose the correct file system type (usually NTFS) and allocate the full capacity of the drive for formatting. This process will erase all data on the USB drive, so be sure to back up any important files before proceeding.
Using the Right Software to Create the Bootable USB
Once your USB drive is formatted correctly, you will need to use special software to make it bootable with Windows 10 Pro. There are several tools available for this purpose, such as Rufus or the Windows USB/DVD Download Tool. These tools will help you transfer the necessary Windows 10 Pro installation files to the USB drive, making it capable of booting up your computer. Follow the instructions provided by the software you choose to complete the process successfully.
Creating the Windows 10 Bootable USB
Now that you have gathered all the essentials and prepared your USB drive, it's time to delve into the process of creating a bootable USB with Windows 10 Pro. Follow these steps carefully to ensure a successful installation.
Transferring Windows 10 Pro Files
First, insert your USB drive into a USB port on your Windows PC. Make sure that no important data is stored on the USB drive, as it will be formatted during this process.
| Step | Description |
|---|---|
| 1 | Download the Windows 10 Pro ISO file from the official Microsoft website. |
| 2 | Insert a USB drive (minimum 8GB) into your computer. |
| 3 | Download and install a tool like Rufus to create a bootable USB drive. |
| 4 | Open Rufus and select the USB drive you inserted as the 'Device'. |
| 5 | Click on 'Select' and choose the Windows 10 Pro ISO file you downloaded. |
| 6 | Make sure the partition scheme is set to 'GPT' and the file system to 'NTFS'. |
| 7 | Click on 'Start' and wait for Rufus to create the bootable USB drive. |
| 8 | Once the process is complete, safely eject the USB drive from your computer. |
| 9 | Insert the bootable USB drive into the computer you want to install Windows 10 Pro on. |
| 10 | Boot the computer from the USB drive by changing the boot order in the BIOS settings. |
| 11 | Follow the on-screen instructions to install Windows 10 Pro on the computer. |
Next, locate the Windows 10 Pro software files that you downloaded from the Microsoft website. These files are typically in a compressed format, so you will need to extract them using a file extraction tool like WinRAR or 7-Zip.
After extracting the files, you will need to copy them onto the USB drive. Simply drag and drop all the extracted files onto the USB drive icon in File Explorer. This process may take some time depending on the size of the files and the speed of your USB drive.
Finalizing Bootable USB Creation
Once all the Windows 10 Pro files have been successfully copied to the USB drive, you need to ensure that the USB is truly bootable. To do this, safely eject the USB drive from your PC and then reinsert it.
Restart your computer and enter the BIOS settings by pressing a specific key during the startup process (usually Del or F2). Within the BIOS settings, look for the boot order configuration and set the USB drive as the first boot option.
Save the changes and exit the BIOS settings. The computer will now restart, and if everything was done correctly, it should boot up from the USB drive. Follow the on-screen instructions to begin the installation of Windows 10 Pro on your PC.
Booting Your PC from the USB Drive
Before you can start your computer using the newly created Windows 10 Pro bootable USB, you need to adjust the boot order in the BIOS settings. BIOS stands for Basic Input/Output System, and it's like the control center of your computer. By changing the boot order, you are telling your computer to start up from the USB drive first before loading the operating system from the hard drive.
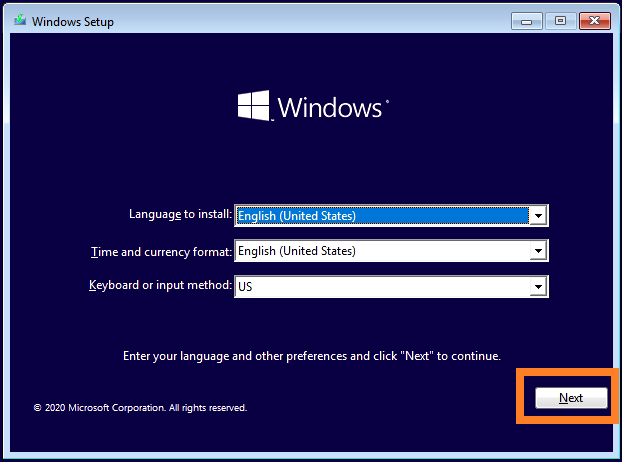
Image courtesy of support.onlogic.com via Google Images
To do this, you need to restart your computer and access the BIOS settings. The method for entering the BIOS can vary depending on the computer manufacturer, but common keys to press during startup include F2, F10, Delete, or Esc. Once you're in the BIOS, navigate to the boot order settings. Here, you should see a list of devices that your computer can boot from.
Locate the option for USB or Removable Devices and move it to the top of the boot order list. You can usually do this by using the arrow keys on your keyboard to select the USB option and then pressing a key (often F5 or F6) to move it up. Once the USB drive is at the top of the list, save the changes and exit the BIOS. Your computer will now prioritize booting from the USB drive.
Starting Windows from USB
After you've set the boot order to prioritize the USB drive, you need to restart your computer again. Make sure the Windows 10 Pro bootable USB is plugged into one of the USB ports before you restart. As soon as the computer powers on, it will detect the USB drive and start loading the Windows 10 Pro setup files from it.
You may see a message on the screen asking you to "Press any key to boot from USB." If you do, go ahead and press any key on the keyboard to initiate the boot process from the USB drive. If you don't see this message, don't worry; your computer is still booting from the USB as per the new boot order you set in the BIOS.
Follow the on-screen instructions to begin the installation of Windows 10 Pro on your computer. You'll be guided through the setup process, including selecting your language, entering the product key (if required), and choosing the installation destination. Once you complete these steps, Windows 10 Pro will be installed on your computer from the bootable USB drive.
Troubleshooting Common Problems
It can be frustrating if your computer doesn't start up from the Windows 10 bootable USB drive. One common reason for this issue is that the boot order in the BIOS settings may not be configured correctly. To fix this, you need to access the BIOS menu by restarting your computer and pressing a specific key (usually F2, F10, ESC, or Del) during startup. Once in the BIOS settings, look for the Boot Order section and make sure the USB drive is set as the primary boot device. Save the changes and restart your PC to see if it now boots from the USB drive.
Handling Errors During Win 10 Pro Booting
During the Windows 10 Pro booting process from the USB drive, you might encounter error messages that can be intimidating. One common error is the "Missing Operating System" message. This could indicate that the USB drive was not properly prepared or the Windows 10 files were not copied correctly. In such cases, double-check if the USB was formatted correctly, the files were copied accurately, and try recreating the bootable USB using the appropriate software.
Wrapping Up
Now that you've learned how to boot Windows 10 Pro from a USB drive, you're one step closer to becoming a tech expert! Remember, this process allows you to start your Windows PC using the operating system stored on a portable USB drive.

Image courtesy of www.pcmag.com via Google Images
By following the steps outlined in this guide, you can fix your computer, install Windows 10 Pro on a new PC, or simply have a handy portable system at your disposal. The possibilities are endless!
Don't stop here! Dive deeper into the world of Microsoft Windows 10 and explore all the amazing features it has to offer. The more you learn, the more confident you'll become in managing and optimizing your Windows PC.
FAQs
Can I Use Any USB Drive to Boot Windows 10 Pro?
To boot Windows 10 Pro from a USB drive, you need to make sure that the USB meets certain requirements. The USB drive must have enough storage space to accommodate the Windows 10 Pro files. Additionally, the USB drive needs to be formatted correctly to ensure a smooth booting process. Therefore, not all USB drives may be suitable for booting Windows 10 Pro.
Do I Need an Internet Connection to Boot from USB?
No, you do not need an internet connection to boot from a USB drive. The Windows 10 Pro files are already stored on the USB drive, so you can start the booting process without being connected to the internet. However, if you need to download any additional files or updates during the installation of Windows 10 Pro, you will require an internet connection at that point.


