Create a Windows 10 Bootable USB Step-by-Step
Uncover the secrets to easily creating a Windows 10 Bootable USB with this comprehensive step-by-step guide for beginners.
Table of Contents
Introduction: Your Adventure to Making a Windows 10 Bootable USB!
Hey there, future tech whiz! Have you ever wanted to create a super cool Windows 10 bootable USB? This guide will take you on a step-by-step journey to do just that. Imagine having the power of Windows 10 in your pocket. Ready? Let’s go!
What You’ll Need: The Treasure List
Before we start our awesome USB-making adventure, let’s make sure you have the tools you’ll need. Don’t worry; it's not a long list, but it’s a very important one!
Gathering Your Tools
We’ll tell you what items you need to gather before diving into the world of creating your Windows 10 bootable USB.
Step 1: Downloading the Windows 10 Software
Every great invention starts with downloading the right stuff. We'll show you where and how to get the Windows 10 software onto your computer.
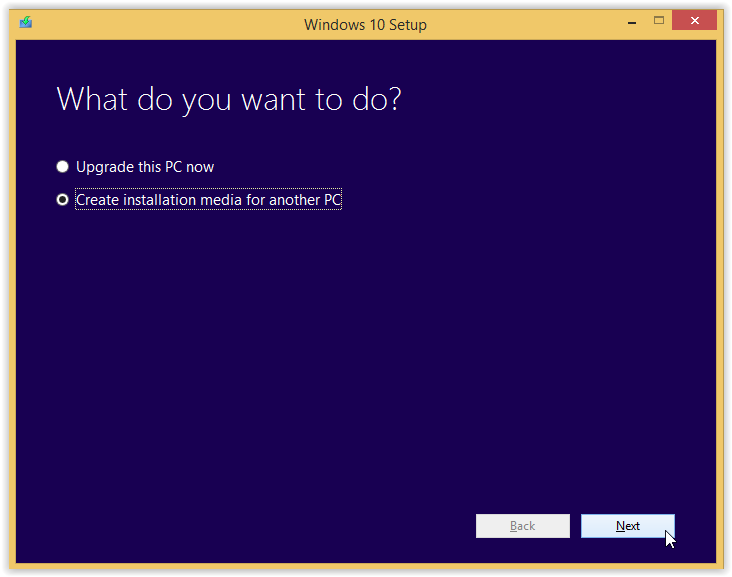
Image courtesy of via Google Images
Where to Find the Windows 10 Download
Alright, let’s get started on our Windows 10 software treasure hunt! The first step is to find the official Microsoft website. Once you’re there, look for the section that says “Download Windows 10” or something similar. Click on it like you’re opening a secret door to a magical kingdom.
Now, you might need to enter your email address or create a Microsoft account to access the download. Don’t worry; it’s super easy and won’t take long. Once you’ve done that, the download should start automatically. If it doesn’t, look for a big button that says “Download Windows 10” and give it a friendly click.
Depending on your internet speed, the download might take some time. So, while you’re waiting, maybe brainstorm all the amazing things you’ll do with your Windows 10 bootable USB. Once the download is complete, you’re all set for the next step of our adventure!
Preparing Your USB Drive
To make your USB a bootable superhero, you’ll need to get it ready for its mission. We'll take you through cleaning it up and making it ready to save the day!
Cleaning Up the USB
Before your USB drive can become a Windows 10 bootable wonder, it needs a good scrubbing. Make sure to back up any important files on your USB drive because the cleaning process will wipe everything out. Once your files are safely stored elsewhere, plug in your USB drive to your computer.
Next, open your File Explorer on your computer and right-click on your USB drive. Select the option to format the drive. This will erase everything on it, so double-check that you've backed up any crucial files!
During the format process, make sure to choose the FAT32 file system, as this is the best option for creating a bootable USB drive. Once the format is complete, you're all set! Your USB drive is now clean, empty, and ready to be transformed into a Windows 10 bootable USB.
Creating the Bootable USB
Get ready to combine the powers of your USB and Windows 10 to create something amazing. We’ll take the downloaded software and put it on your USB for the ultimate transformation.

Image courtesy of via Google Images
Transferring Windows 10 to Your USB
It's like a magic spell – we'll show you how to transfer Windows 10 onto your USB and make it bootable. This step is where your USB drive becomes the hero you need in times of tech emergencies.
| Step | Description |
|---|---|
| 1 | Download the Windows 10 ISO file from Microsoft's website. |
| 2 | Insert a USB flash drive with at least 8GB of storage into your computer. |
| 3 | Open the Windows USB/DVD Download Tool or Rufus software. |
| 4 | Select the Windows 10 ISO file you downloaded in Step 1. |
| 5 | Choose the USB drive you inserted in Step 2 as the destination for the bootable USB. |
| 6 | Click "Start" to begin creating the bootable USB. |
| 7 | Wait for the process to complete and then safely eject the USB drive from your computer. |
| 8 | Your Windows 10 bootable USB is now ready to use. |
First, plug your USB drive into your computer. Make sure it's empty, or you might lose any important files on it. Double-check the capacity of your USB to ensure it can handle the Windows 10 software. Now, locate the Windows 10 software file you downloaded earlier.
Next, it's time to use a special tool called Rufus to put the Windows 10 software onto your USB drive. Rufus is like a magical wand that helps your USB become a bootable tool. Open Rufus and select your USB drive from the dropdown menu. Then, click on the "Select" button to choose the downloaded Windows 10 software file.
With everything set, hit the "Start" button in Rufus, and watch the magic happen. Rufus will work its spell and transfer the Windows 10 software to your USB, making it a powerful bootable USB drive. Once the process is complete, you'll have your very own Windows 10 bootable USB ready to use.
Step 4: Testing Your Bootable USB
You’ve done the hard part, champ! Now it’s time to ensure that your brand new superhero gadget, the Windows 10 bootable USB, is all set to go into action. Let’s put it through its paces with a quick test to make sure it’s ready for any challenge that comes its way.
How to Test Your New Bootable USB
Let’s dive into the testing phase to give your bootable USB a trial run before any emergency strikes. Here’s what you need to do:
1. Insert your bootable USB: Carefully insert your newly created bootable USB into a spare USB port on your computer. Make sure it fits snugly.
2. Restart your computer: Once the USB is inserted, restart your computer. During the startup process, you may need to press a specific key (like F2 or Delete) to enter the BIOS settings.
3. Choose USB as the boot device: In the BIOS settings, locate the Boot Order or Boot Priority section. Set the USB drive as the first boot option. Save your changes and exit the BIOS settings.
4. Let the magic begin: Your computer will now boot from the USB drive. If everything went smoothly, you should see the Windows logo appear on your screen – that’s your signal that the bootable USB is working perfectly!
5. Explore and test: Once Windows 10 loads from the USB, take some time to click around and make sure everything is running smoothly. Try opening apps, browsing the internet – basically, put your bootable USB through its paces to ensure it’s ready for any task.
By following these steps, you can rest assured that your Windows 10 bootable USB is primed and ready for any adventure that comes its way. Congratulations on your successful creation!
Conclusion: You Did It!
Wow, you’ve reached the end of this adventure! You now have your very own Windows 10 bootable USB. What a journey it has been!

Image courtesy of via Google Images
Frequently Asked Questions (FAQs)
Can I use my bootable USB on other computers?
Yes, you can! Your awesome Windows 10 bootable USB can be used on different computers. You can help your friends out by letting them use it to fix their computer issues or use it on another computer to access Windows 10 anytime, anywhere.
What if my computer is older and has Windows 8.1 or Windows 7?
No worries at all! If your computer is running on Windows 8.1 or Windows 7, your Windows 10 bootable USB can still work its magic. You can use it to upgrade your older operating system to Windows 10 and enjoy all the new features it has to offer.
What happens if I get a new computer with Windows 11?
If you happen to get a spiffy new computer with Windows 11 installed, don’t fret. While your Windows 10 bootable USB won't work on a computer with Windows 11 straight out of the box, you can still keep it handy for use on other devices or as a backup in case you need to use Windows 10 in the future.


