Create Bootable USB for Win 11
Unlock the secrets of creating a bootable USB for the latest Windows 11 update with this step-by-step guide!
Table of Contents
- Introduction: What is a Bootable USB and Why Do You Need It for Windows 11?
- Preparation: What You Need Before Creating a Bootable USB Drive
- Downloading the Windows 11 Installation File
- Creating Your Windows 11 Bootable USB Drive
- Installation: Using the Bootable USB to Install Windows 11
- Troubleshooting Common Issues
- Conclusion: Ready to Go With Windows 11
- FAQs
Introduction: What is a Bootable USB and Why Do You Need It for Windows 11?
Have you ever heard of a bootable USB? It may sound like a fancy term, but it's actually quite simple and super useful, especially when it comes to installing or upgrading to the new Windows 11 operating system. Let's dive into what a bootable USB is and why it's essential for getting Windows 11 up and running on your computer.
Understanding a Bootable USB
So, what exactly is a bootable USB? Well, think of it as a magic wand that helps you bring your computer to life with a new operating system like Windows 11. A bootable USB drive is a small, portable device that contains all the necessary files to install or upgrade an operating system on your computer. It's like having a secret key to unlock the door to a brand-new Windows world!
Why Windows 11 Needs a Bootable USB
Now, you might be wondering why you need a bootable USB specifically for Windows 11. The answer is simple - without it, you won't be able to easily install this shiny new operating system on your computer. Whether you're setting up a new PC, moving from an older Windows version like Windows 10, or need to fix some issues with your system, a bootable USB for Windows 11 is your superhero sidekick in getting things done.
Preparation: What You Need Before Creating a Bootable USB Drive
Before diving into creating a bootable USB drive for Windows 11, there are a few essential things you need to have in place. Let's take a look at what you should prepare before embarking on this journey.
Choosing the Right Windows 11 Version
First and foremost, you need to decide which version of Windows 11 you want to install on your computer. There are two main editions to choose from: Windows 11 Home and Windows 11 Pro. Windows 11 Home is suitable for most users and includes all the essential features, while Windows 11 Pro offers additional functionalities geared towards business and advanced users.
Gathering the Necessary Tools and Materials
Once you've settled on the Windows 11 version you want, it's time to gather the tools and materials required for creating a bootable USB drive. You'll need a USB flash drive with sufficient storage capacity to accommodate the Windows 11 installation files. Make sure the USB drive is empty as the process will erase all data on it. Additionally, you'll need access to a computer with an internet connection to download the necessary files and software.
Downloading the Windows 11 Installation File
Before you can create a bootable USB drive for Windows 11, you need to get the installation file. It's important to download Windows 11 from official sources to ensure you're getting a safe and reliable version of the operating system. You can visit the official Microsoft website or use the Media Creation Tool provided by Microsoft to download the installation file.
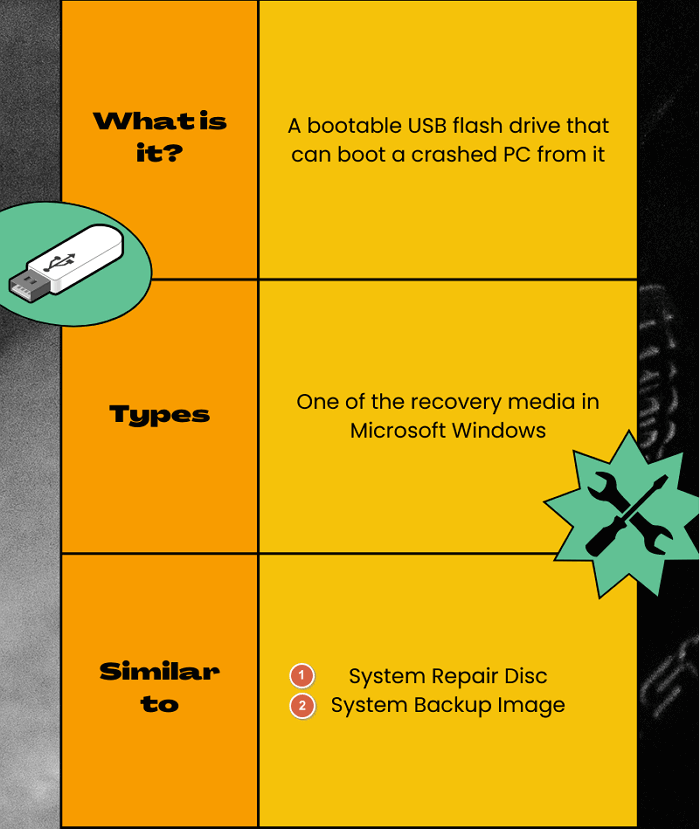
Image courtesy of www.easeus.com via Google Images
Choosing the Correct File for Your USB
When downloading Windows 11, make sure you select the right file for creating your bootable USB drive. You'll need to choose the version of Windows 11 you want, whether it's Windows 11 Home or Windows 11 Pro. Additionally, you need to be mindful of your system architecture, whether it's 32-bit or 64-bit, to select the appropriate file that matches your computer's specifications. By downloading the correct version, you can ensure a smooth installation process without any compatibility issues.
Creating Your Windows 11 Bootable USB Drive
Before you can begin the process of creating a bootable USB drive for Windows 11, it's essential to ensure that your USB drive is formatted correctly. Formatting your USB drive will erase all existing data, so make sure to back up any important files before proceeding.
Using the Right Software to Create the Bootable Drive
Once you have a clean and formatted USB drive, you will need to use the right software to create the bootable drive. There are several software options available, such as Rufus or the Windows Media Creation Tool, that can help you create a bootable USB drive for Windows 11.
| Step | Description |
|---|---|
| 1 | Download the Windows 11 ISO file from Microsoft's official website. |
| 2 | Insert a USB flash drive with at least 8GB of storage capacity into your computer. |
| 3 | Download and install a bootable USB creation tool like Rufus. |
| 4 | Open the bootable USB creation tool and select the Windows 11 ISO file. |
| 5 | Choose the USB flash drive as the destination for the bootable USB. |
| 6 | Click on the "Start" or "Create" button to begin creating the bootable USB. |
| 7 | Wait for the tool to finish creating the bootable USB for Windows 11. |
| 8 | Once the process is complete, safely eject the USB flash drive from your computer. |
When using the software, follow the step-by-step instructions provided to select the Windows 11 installation file you downloaded earlier and choose the USB drive as the destination for the bootable drive. The software will then take care of the rest, creating a bootable USB drive that you can use to install or upgrade to Windows 11.
Installation: Using the Bootable USB to Install Windows 11
Before you can install Windows 11 using your bootable USB drive, you need to ensure that your computer is set up to boot from the USB drive. To do this, you will need to access your computer's BIOS or UEFI settings. These settings control the boot order of your computer, determining which device it boots from first.
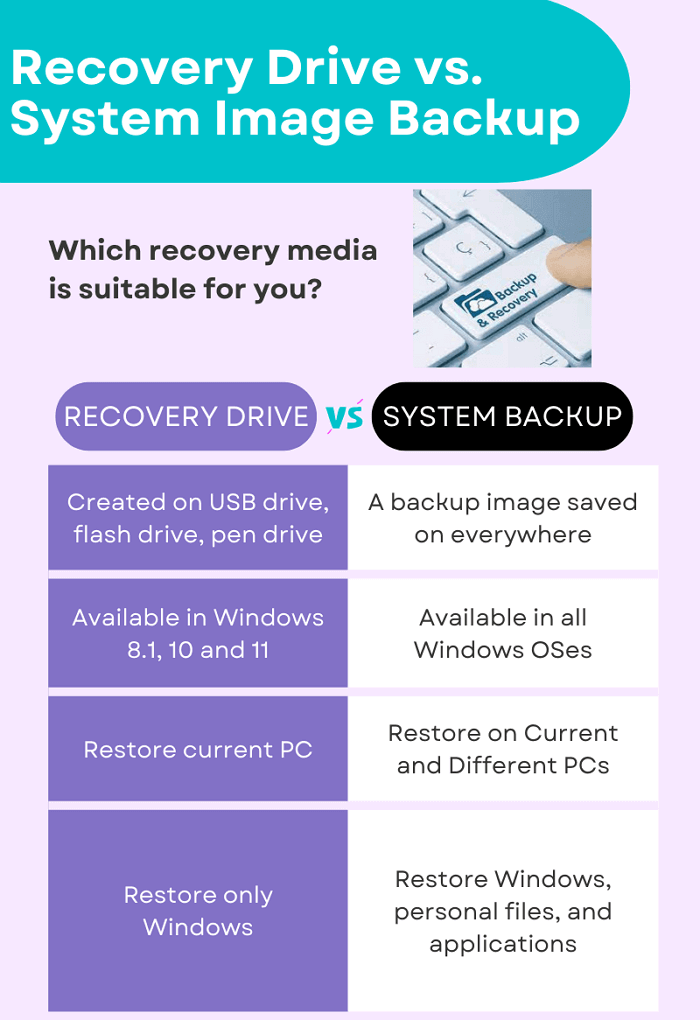
Image courtesy of www.easeus.com via Google Images
When you start your computer, you typically see a message that prompts you to press a key (like F2 or Delete) to enter the BIOS or UEFI settings. Once in the settings, look for the boot options and set the USB drive as the first boot device. Save the changes and exit the settings to restart your computer.
The Installation Process
After setting up your computer to boot from the USB drive, the installation process for Windows 11 is straightforward. When you turn on your computer with the bootable USB inserted, it should automatically start the Windows 11 installation process.
Follow the on-screen instructions to select your language, time format, and keyboard input method. Then, enter the product key if required and choose between Windows 11 Home or Windows 11 Pro version. Next, select the installation type (upgrade or custom) and specify the drive you wish to install Windows on. Finally, wait for the installation process to complete.
Once the installation is finished, your computer will restart, and you'll be greeted with the new Windows 11 login screen. Congratulations, you have successfully installed Windows 11 using your bootable USB drive!
Troubleshooting Common Issues
When creating or using a bootable USB for Windows 11, you may encounter some common issues that can be frustrating. Here are some tips to help you troubleshoot and resolve these problems:
USB Not Recognized
If your computer doesn't recognize the bootable USB drive, try the following steps:
1. Ensure that the USB drive is properly inserted into the USB port.
2. Check if the USB port is functioning by trying a different port.
3. Restart your computer and try again.
Errors During Booting or Installation
If you encounter errors during the booting or installation process, here's what you can do:
1. Make sure you have followed all the steps correctly in creating the bootable USB.
2. Check the integrity of the Windows 11 installation file by re-downloading it from a reliable source.
3. If the errors persist, consider using a different USB flash drive or creating the bootable USB on a different computer.
By following these troubleshooting steps, you can overcome common issues when creating or using a bootable USB for Windows 11. Remember, patience and attention to detail are key in resolving these problems.
Conclusion: Ready to Go With Windows 11
Now that you've successfully created a bootable USB for Windows 11, you're ready to embark on a seamless installation journey. By following the steps outlined in this guide, you've equipped yourself with the tools and knowledge needed to enjoy the benefits of the new Windows operating system. Whether you're upgrading from Windows 10 or installing Windows 11 on a new computer, you can now proceed with confidence.
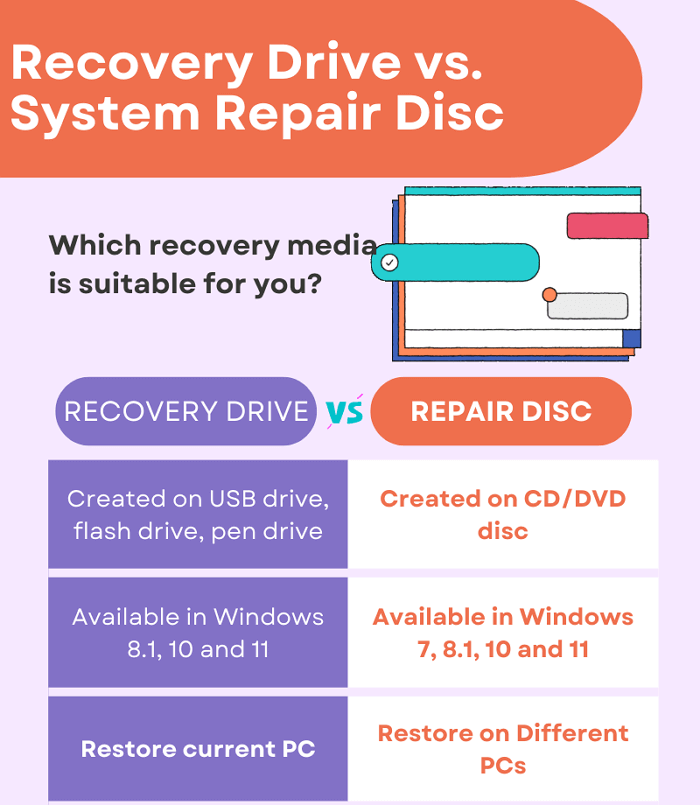
Image courtesy of www.easeus.com via Google Images
Remember, having a bootable USB not only allows you to install Windows 11 conveniently but also serves as a handy tool for system repairs or troubleshooting in the future. The flexibility and portability of a bootable USB make it an essential asset for any Windows user.
As you delve into the world of Windows 11, explore its new features, enhanced performance, and improved user experience. Embrace the innovation and functionality that Windows 11 has to offer, and make the most out of your computing experience.
FAQs
Can I create a Windows 11 bootable USB from a Mac or Linux?
Unfortunately, creating a Windows 11 bootable USB from a Mac or Linux system is not as straightforward as from a Windows operating system. Windows typically provides tools like Media Creation Tool to create bootable USBs. However, you can explore third-party software options compatible with Mac or Linux that support creating a Windows bootable USB.
How much storage space do I need on my USB for Windows 11?
For creating a bootable USB for Windows 11, you'll need a USB flash drive with a minimum of 8 GB of storage space. This size is sufficient to accommodate the Windows 11 installation file and ensure a smooth installation or upgrade process without running into any storage issues.
Generated by Texta.ai Blog Automation


