Create Win 10 USB in Steps
Unveil the ultimate guide to creating a Windows 10 USB in simple steps. Upgrade your tech skills effortlessly today!
Table of Contents
Introduction to Creating a Windows 10 Bootable USB
In this section, we will explore the concept of a Windows 10 Bootable USB and why it is a handy tool to have. Let's dive into what a bootable USB is and why it matters when dealing with Microsoft Windows 10.
What is a Bootable USB?
A bootable USB is like a magic wand that can help start up your computer, just like Harry Potter's wand starts his spells. It contains all the important pieces needed to make your computer's brain, known as the operating system, wake up and get to work. When you plug in a bootable USB and turn on your computer, it tells your computer how to start up and run the Windows 10 program.
Why Do You Need One?
Imagine you have a favorite toy that sometimes gets broken. You might need to fix it to play with it again. Similarly, if something goes wrong with your computer's Windows 10 program, having a bootable USB can help fix it. It's like having a secret superhero hiding in your pocket, ready to save the day when your computer needs help!
Preparing to Create Your Bootable USB
Before you start creating your Windows 10 bootable USB, you need to decide whether you want to use Windows 10 Home or Windows 10 Pro. The choice depends on what features you need and how you plan to use your computer.
Gathering the Necessary Tools
Once you have decided on the Windows 10 version, make sure you have everything you need to create the bootable USB. You will need a USB drive with enough storage space and a computer running Windows or macOS. Additionally, you will need to download the Windows 10 installation file and the Windows USB/DVD Download Tool if you are using Windows, or the Terminal app if you are on a Mac.
Creating the Bootable USB - Step by Step
Before creating a bootable USB for Windows 10, you need to download the Windows 10 installation file from Microsoft's official website. This file contains all the necessary data to install or repair your Windows operating system.
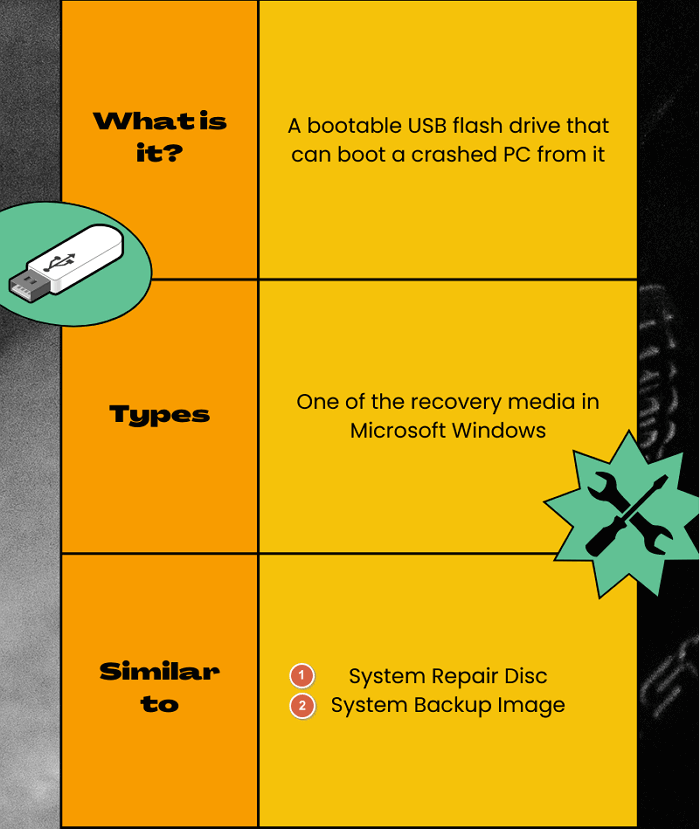
Image courtesy of www.easeus.com via Google Images
Formatting Your USB Drive
Next, you'll need to format your USB drive to ensure that it is ready to become a bootable device. To do this, insert the USB drive into your computer and right-click on it in the File Explorer. Then, select the 'Format' option and choose the file system as FAT32. Click 'Start' to initiate the formatting process.
Using the Windows 10 Media Creation Tool
After downloading the Windows 10 installation file and preparing your USB drive, the next step is to use Microsoft's Windows 10 Media Creation Tool. This tool will help you create the bootable USB by transferring the Windows 10 setup files onto your USB drive. Simply follow the on-screen instructions provided by the tool to complete the process.
Testing Your New Bootable USB
Now that you have created your Windows 10 bootable USB, it's important to make sure it works correctly before you need it in an emergency. Here's how you can test your new bootable USB to ensure it's ready to go when you need it.
Booting from the USB
The first step in testing your bootable USB is to boot your computer from it. To do this, insert the USB drive into a USB port on your computer and then restart your device. During the startup process, you may need to access the boot menu. This can usually be done by pressing a specific key (like F2, F12, or ESC) as your computer starts up. From the boot menu, select the option to boot from the USB drive.
If everything is working correctly, your computer should start up using the Windows 10 installation files on the USB drive. This means that your bootable USB is functioning as it should.
Troubleshooting Common Issues
Sometimes, you may encounter issues when trying to boot from your USB drive. Here are a few common problems and how you can troubleshoot them:
| Step | Description |
|---|---|
| Step 1 | Insert a USB drive (at least 8GB) into your computer |
| Step 2 | Download the Windows 10 ISO file from the official Microsoft website |
| Step 3 | Download and install a free tool like Rufus or Windows USB/DVD Download Tool |
| Step 4 | Open the tool and select the Windows 10 ISO file |
| Step 5 | Choose the USB drive as the destination for the Windows 10 installation files |
| Step 6 | Click "Start" or "Create" to begin creating the Windows 10 USB drive |
| Step 7 | Wait for the process to complete and then safely eject the USB drive |
If your computer doesn't recognize the USB drive, make sure it's inserted correctly and try using a different USB port. You can also double-check that the USB drive is formatted correctly and contains the necessary files.
If your computer starts from the USB but encounters errors during the installation process, it may indicate a problem with the Windows 10 files on the USB drive. In this case, you can try creating the bootable USB again using the Windows 10 Media Creation Tool.
By following these simple steps and troubleshooting tips, you can ensure that your Windows 10 bootable USB is working properly and ready to use whenever you need it. Testing your bootable USB is an essential step in the process of creating a reliable backup for your operating system.
Maintaining Your Bootable USB
After creating your Windows 10 bootable USB, it's essential to know how to maintain it properly. Follow these tips to ensure your bootable USB stays safe and up to date.
Image courtesy of www.easeus.com via Google Images
Updating Windows 10 on the USB
Just like your computer needs updates, your bootable USB should also be kept current. Periodically check for the latest updates for Windows 10 and make sure to install them on your bootable USB. This will ensure that you have the most recent features and security patches available when you need to use it.
Storing Your USB Safely
It's crucial to store your bootable USB in a safe and secure place. Avoid leaving it lying around where it can get damaged or lost. Consider keeping it in a protective case or a designated spot where you will always know where to find it. By taking care of your bootable USB, you can ensure that it will be ready for use whenever you need it.
Conclusion
In conclusion, creating a Windows 10 bootable USB is a vital skill to have for any computer user. Whether you need to install a fresh copy of Windows 10 or troubleshoot issues with your operating system, having a bootable USB can save you time and effort.
Key Steps Recap:
First, ensure you have the correct version of Windows 10 selected – either Home or Pro based on your requirements. Then, gather the necessary tools like a USB drive and the Windows 10 installation file. Next, format your USB drive properly and use the Windows 10 Media Creation Tool to make it bootable. Test your bootable USB by booting your computer from it and troubleshoot any common issues that may arise.
Importance of a Bootable USB:
A Windows 10 bootable USB provides you with a portable and reliable way to access Windows 10 installation files, enabling you to easily reinstall or repair your operating system. This handy tool gives you the flexibility to address system issues without the need for an optical drive or internet connection.
By following the step-by-step guide outlined in this article, you can create your own Windows 10 bootable USB and ensure that you are always prepared for any software emergencies that may arise.
FAQs
Can you use the bootable USB on different computers?
Yes, you can use a Windows 10 bootable USB on different computers. It is a versatile tool that allows you to install or repair the operating system on various devices, as long as they are compatible with Windows 10.
How many times can you use the bootable USB?
You can use the bootable USB as many times as you need. Whether you are installing Windows 10 on a new computer or repairing an existing installation, the bootable USB can be reused multiple times without any limitations.


