Create Win 11 Boot Drive

Discover the step-by-step guide to creating your own Win 11 boot drive and never worry about system crashes again!
Table of Contents
Introduction to Boot Drives and Windows 11
Have you ever heard of a boot drive? It might sound like something only grown-ups need, but understanding what a boot drive is and why it's important for Windows 11 can actually be pretty fascinating. In this section, we'll explore how boot drives work and why they are useful, whether you have Windows 11 Home or Pro.
Understanding Boot Drives
Before we dive into why boot drives are essential for Windows 11, let's first uncover what they actually are. A boot drive is like a magic key that helps your computer start up smoothly. It contains all the necessary instructions and files needed to kickstart your Windows operating system and get your computer up and running.
Why Windows 11 Needs a Boot Drive
Now that we know what a boot drive does, why would someone want to create one specifically for Windows 11? Well, having a boot drive for Windows 11 can come in handy for a few reasons. Whether you're looking to install Windows 11 on a new computer or need to recover your system when things go wrong, a boot drive can be a lifesaver. It's like having a superhero cape for your computer!
Preparing to Create Your Windows 11 Boot Drive
Before diving into the process of creating your Windows 11 boot drive, there are a few important steps you need to take. This section will guide you through the essential preparations to ensure a smooth and successful setup.
System Requirements
Firstly, you need to check if your computer meets the system requirements for installing Windows 11. Make sure your device has the necessary specifications to run the new operating system smoothly. If you are uncertain, you can visit the official Microsoft website to verify if your hardware is compatible with Windows 11.
Gathering Materials
To create your Windows 11 boot drive, you will need a few key materials. The primary item you'll need is a USB drive with sufficient storage capacity to hold the Windows 11 installation files. Additionally, you'll require access to a computer running Windows 10 to facilitate the creation process. If your current system does not have Windows 11 installed, you can use a Windows 10 device to carry out the initial steps.
Formatting Your USB Drive
Before you can create your Windows 11 boot drive, you need to format your USB drive properly. Formatting erases all the data on the drive, so make sure to back up any important files before proceeding.
Downloading Windows 11 Installation Media
To get the Windows 11 installation files, you will need to download them from Microsoft's official website. Make sure you choose the correct version (Home or Pro) and follow the instructions provided on the website.
Transferring Files to USB Drive
Once you have downloaded the Windows 11 installation files, you need to transfer them to your USB drive to make it bootable. Use a reliable software tool like Rufus to create a bootable USB drive with the Windows 11 files.
Testing the Windows 11 Boot Drive
Now that you have successfully created your Windows 11 boot drive, it's time to test it to ensure everything works as expected. This step is crucial before you actually need to rely on it for installation or recovery purposes.
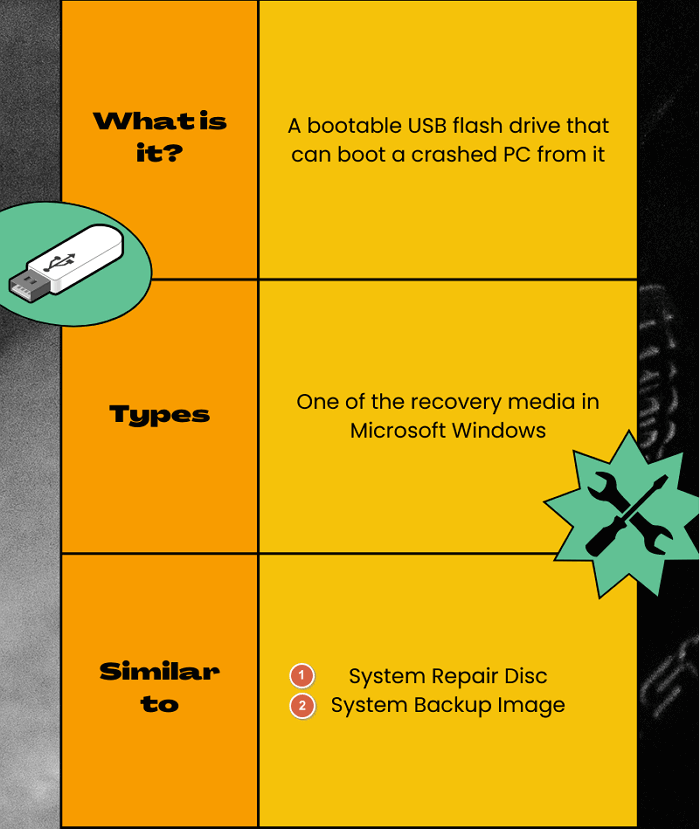
Image courtesy of www.easeus.com via Google Images
Boot From the USB Drive
To test your Windows 11 boot drive, you will need to boot your computer from the USB drive. To do this, you will need to insert the USB drive into a USB port on your computer and then restart your system. During the boot-up process, you will need to access the boot menu, which is usually done by pressing a specific key (like F12 or ESC) as your computer starts up.
| Step | Instructions |
|---|---|
| 1 | Download the Windows 11 ISO file from the official Microsoft website. |
| 2 | Insert a USB flash drive with a minimum of 8 GB storage capacity into your computer. |
| 3 | Open the Windows 11 Media Creation Tool and select "Create installation media for another PC". |
| 4 | Choose the language, edition, and architecture that matches the ISO file you downloaded. |
| 5 | Select the USB flash drive as the destination for the Windows 11 boot drive. |
| 6 | Follow the prompts to create the bootable USB drive and wait for the process to complete. |
| 7 | Once the process is finished, safely eject the USB drive and use it to boot your computer with Windows 11. |
Once you are in the boot menu, you should see a list of devices to boot from. Select the USB drive that contains your Windows 11 installation files and press Enter. Your computer should start loading the Windows 11 setup files from the USB drive.
Troubleshooting Common Issues
If you encounter any issues while trying to boot from the USB drive, don't worry. Here are a few common problems and their solutions:
1. USB Drive Not Recognized: If your computer does not detect the USB drive, try using a different USB port. Sometimes, certain USB ports may not work during the boot process.
2. Error Messages: If you see error messages during the boot-up process, make sure that the Windows 11 installation files were copied correctly to the USB drive. You may need to recreate the boot drive if errors persist.
3. Booting Into the Wrong Drive: If your computer boots into the wrong drive (for example, the internal hard drive instead of the USB drive), you may need to change the boot order in your system's BIOS settings. Consult your computer's manual for instructions on how to do this.
By following these troubleshooting steps, you should be able to successfully test your Windows 11 boot drive and ensure that it is ready for use when needed.
Using Your Windows 11 Boot Drive
Now that you have successfully created your Windows 11 boot drive, it's time to explore how you can utilize it. Whether you need to install Windows 11 on a new computer or recover a system that is failing to start, your boot drive is your go-to solution. Let's dive into how you can make the most of this essential tool.
Installing Windows 11
If you are setting up a new computer or simply want to upgrade to Windows 11, your boot drive is your key to a smooth installation process. Here's how you can use it:
1. Insert the boot drive into a USB port on your computer.
2. Power on the computer and access the boot menu (usually by pressing a specific key during startup).
3. Select the boot drive from the menu to start the Windows 11 installation process.
4. Follow the on-screen instructions to set up Windows 11 on your computer.
5. Once the installation is complete, your computer will restart, and you can begin using Windows 11.
Recovering Your System
If you encounter issues with your Windows 11 system and it fails to start properly, your boot drive can come to the rescue. Here's how you can use it to recover your system:
1. Insert the boot drive into a USB port on your computer.
2. Power on the computer and access the boot menu.
3. Select the boot drive to boot from it and access the advanced recovery options.
4. Choose the appropriate recovery option based on your specific needs, such as repairing startup issues or restoring your system to a previous state.
5. Follow the on-screen instructions to complete the recovery process and get your Windows 11 system back up and running.
With your Windows 11 boot drive at hand, you have the power to install Windows 11 on new computers, upgrade existing systems, and easily recover from potential issues. Make sure to keep your boot drive in a safe place for future use, as it can be a lifesaver when you least expect it.
Conclusion and Recap
In this blog post, we covered the important topic of creating a Windows 11 boot drive. We started by explaining what boot drives are and why they are essential for Windows 11, whether you are using the Home or Pro version. Understanding the significance of a boot drive can help you in various situations, from installing a fresh copy of Windows to recovering a malfunctioning system.
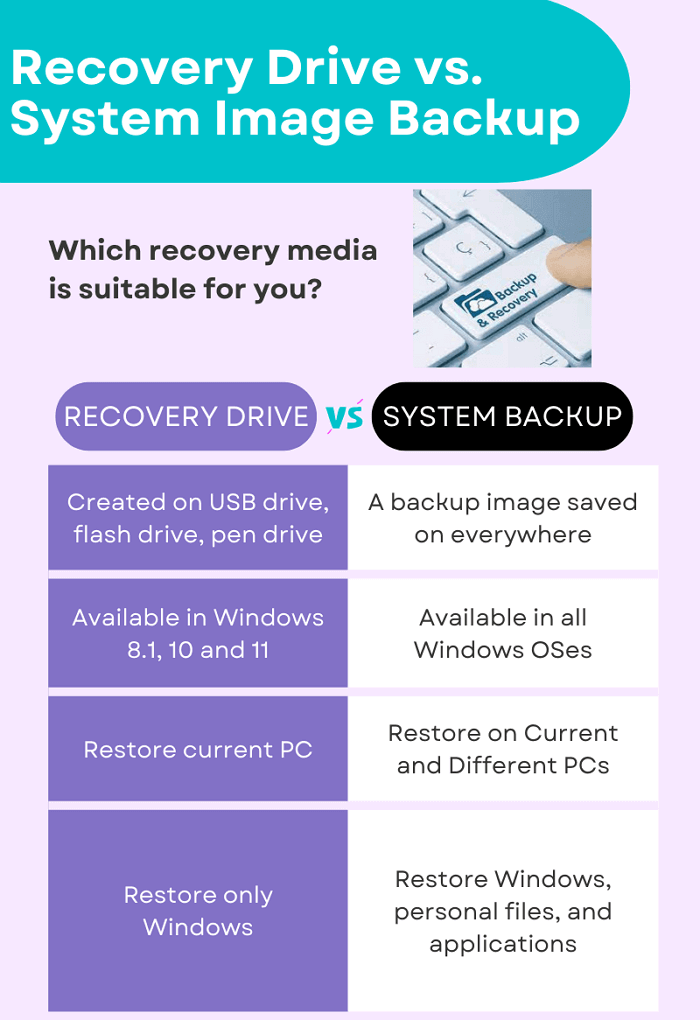
Image courtesy of www.easeus.com via Google Images
Key Steps in Creating Your Windows 11 Boot Drive
We then detailed the preparation process for creating a Windows 11 boot drive. This involved ensuring your system meets the necessary requirements and gathering the materials needed, such as a USB drive and a computer with access to Windows 10. Following this, we provided a step-by-step guide on how to format your USB drive, download the Windows 11 installation files, and transfer them to the USB drive to make it bootable.
Testing and Using Your Windows 11 Boot Drive
Testing the boot drive is crucial, and we explained how to boot from it and troubleshoot common issues that may arise during the process. Once your boot drive is ready, we outlined how to use it to either install Windows 11 on a new system or recover an existing one that is experiencing problems.
By following these steps, you can confidently create and use a Windows 11 boot drive to enhance your computing experience and tackle any issues that may arise with your system.
Frequently Asked Questions (FAQs)
Can I use my Windows 11 boot drive on different computers?
Yes, you can use your Windows 11 boot drive on different computers as long as they meet the system requirements for Windows 11. The boot drive contains the necessary files to install or recover Windows 11 on a compatible device. Just insert the boot drive into a USB port and follow the steps to either install Windows 11 or run recovery tools on the computer.
What size USB drive do I need for a Windows 11 boot drive?
To create a Windows 11 boot drive, you will need a USB drive with a minimum size of 8GB. However, it is recommended to use a USB drive with a larger capacity to ensure that there is enough space for all the necessary installation files. A larger USB drive will also give you room to add other tools or files to the boot drive if needed.


