Create Win 11 Bootable USB Easily
Discover the simple, step-by-step process to effortlessly create a bootable USB for the highly anticipated Windows 11 upgrade!
Table of Contents
Introduction: Get Ready to Create Your Win 11 Bootable USB!
We're going to learn how to make a special USB stick that lets you install Windows 11 on a computer! If you have a computer that needs to have Windows 11 on it, this is the way to do it. Let's get started on this cool project!
What is a Bootable USB?
A bootable USB is like a key that unlocks the door to installing new Windows on your computer! It's a special USB stick that contains all the necessary software to start the installation process of a new operating system, like Windows 11, on your computer.
Why Do You Need One?
Having a bootable USB allows you to put Windows 11 onto a computer, even if it doesn't have any operating system on it yet. It's a handy tool to have when you want to upgrade to a new version of Windows or if you need to install Windows on a new computer.
Bootable USB vs Regular USB
A bootable USB is different from a regular USB because it has the software needed to boot up your computer and start the process of installing Windows. Regular USB drives are used to store files and data, but a bootable USB is specifically prepared to initiate the installation of an operating system like Windows 11.
Before You Start: What You Need
Before we dive into creating your special USB stick that will help you install Windows 11 on a computer, let's make sure you have everything you need to get started!
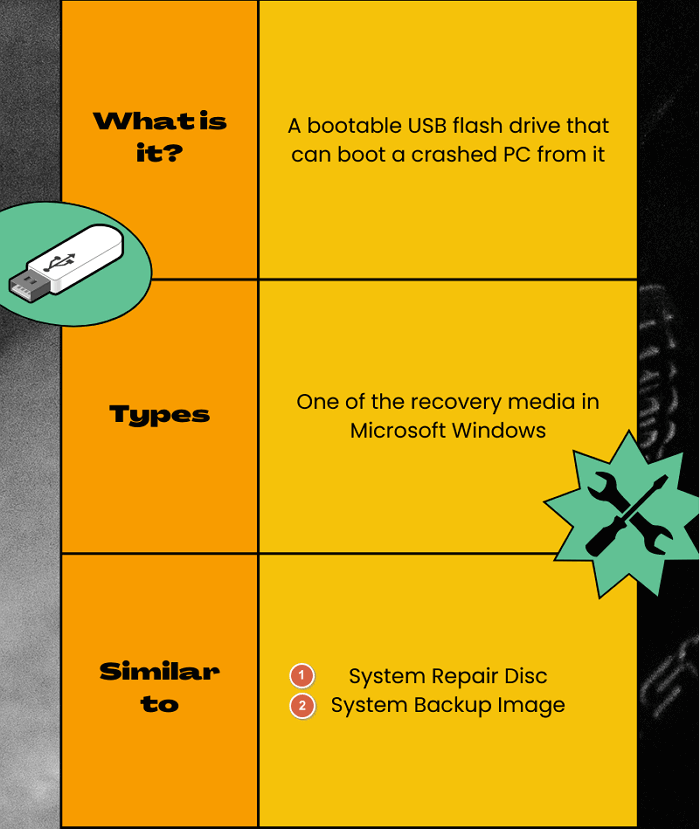
Image courtesy of www.easeus.com via Google Images
Choosing the Right USB Stick
First things first, you'll need a USB stick that has enough space to hold all the Windows 11 files. Make sure to pick a USB stick with plenty of storage so that the installation process goes smoothly.
Gathering the Proper Software
Next, you'll need a special program from Microsoft that will help you make your USB stick ready for Windows 11. This program is essential for preparing the USB stick and getting it all set up for the installation process.
Step-by-Step Guide to Making Your Win 11 Bootable USB
Let's walk through the process of creating your very own bootable USB stick for installing Windows 11 on a computer. Follow these simple steps, and you'll be ready to go in no time!
Downloading the Right Windows 11 File
Before you can create your bootable USB, you'll need to download the Windows 11 files from Microsoft's official website. Make sure to select the right version of Windows 11 that you want to install on your computer.
Using the Microsoft Tool to Set Up Your USB
Next, you'll need to use a special program provided by Microsoft to set up your USB stick. This program will help you prepare the USB drive for the installation of Windows 11. Follow the on-screen instructions to proceed with the setup.
Copying Windows 11 to Your USB
Once you have the Windows 11 files downloaded and the Microsoft tool ready, it's time to copy Windows 11 onto your USB stick. The program will take care of transferring all the necessary files and configurations onto the USB drive, getting it ready for installation.
| Steps | Details |
|---|---|
| Step 1 | Download the official Windows 11 ISO file from the Microsoft website. |
| Step 2 | Insert a USB drive (at least 8GB) into your computer. |
| Step 3 | Download and install the Rufus tool on your computer. |
| Step 4 | Open Rufus tool and select the Windows 11 ISO file you downloaded. |
| Step 5 | Choose the USB drive to create a bootable Windows 11 USB. |
| Step 6 | Click on the "Start" button in Rufus to begin creating the bootable USB. |
By following these simple steps, you'll have your own bootable USB stick with Windows 11 all set to go. Now, you can use it to install Windows 11 on any compatible computer!
Let's check to make sure your USB stick can start the process of installing Windows 11!
Restarting Your Computer With the USB Plugged In
You'll need to start your computer with the USB stick in to see if it works. When your computer is on, turn it off and then plug the USB stick into one of the USB ports. After that, turn your computer back on. You might see a message that says something like "press any key to boot from USB." If you see this, press any key on your keyboard to continue.
Choosing the USB as a Boot Option
Tell your computer to look at the USB stick when it's starting so it can begin installing Windows 11. During the start-up process, your computer will show a logo, and at the bottom of the screen, it might say something like "Press F12 for Boot Menu." Press the designated key (like F12) on your keyboard to open the boot menu. From there, use the arrow keys to select your USB stick from the list of options and press Enter. This tells your computer to start up using the Windows 11 files on your USB stick.
Troubleshooting Common Issues
If things don't work right away, no worries! Here's how to fix some common problems.
Image courtesy of www.easeus.com via Google Images
What If My Computer Doesn't Recognize the USB?
Sometimes you need to tell your computer to check the USB stick again. Don't worry, it's an easy fix! First, unplug the USB stick and then plug it back into a different USB port on your computer. Make sure it's plugged in securely and try restarting your computer. If it still doesn't recognize the USB, you may need to go into your computer's BIOS settings. BIOS stands for Basic Input/Output System, and it's like the brain of your computer. You can usually access the BIOS settings by pressing a specific key when your computer starts up, like F2 or Delete. Inside the BIOS settings, look for the Boot options and make sure the USB is set as a bootable device. Save your changes and restart your computer. Your computer should now recognize the USB and start the Windows 11 installation process.
Error Messages and How to Fix Them
If you see any error messages while trying to boot from the USB stick, don't panic! Here are a few common messages and how to fix them:
"Bootmgr is missing": This message usually means that your computer can't find the boot manager, which is necessary to start Windows 11. To fix this, restart your computer with the USB stick inserted. When your computer starts up, press a key like F12 to access the boot menu. From the boot menu, select the USB stick as the boot device. This should resolve the issue and start the Windows 11 installation process.
"No bootable device found": If you see this message, it means that your computer is having trouble recognizing the USB stick as a bootable device. Double-check that the USB stick is inserted correctly and that your computer's BIOS settings are configured to boot from USB. Restart your computer, access the BIOS settings, and ensure that the USB stick is set as the primary boot device. Save your changes and restart your computer. This should solve the problem and allow your computer to boot from the USB and start the Windows 11 installation.
Conclusion: You Did It!
Wow, you did an amazing job learning how to create a bootable USB stick to install Windows 11! You should be really proud of yourself for taking on this new challenge.
Now, with your newfound skills, you can help friends and family install Windows 11 on their computers too. It's like being a tech superhero!
Keep up the great work and remember, the more you practice, the easier it will become. Who knows, maybe one day you'll be the go-to person for all things tech in your circle!
FAQs: Questions You Might Have
Can I use the USB on different computers?
Yes, you can use the bootable USB stick on lots of different computers! It's like having a magic key that can unlock the door to installing Windows 11 on any computer you want.
How long does it take to make a bootable USB?
Creating a bootable USB doesn't take too long, but you'll need to be a little patient. The process involves copying all the necessary files onto the USB stick, so it might take a bit of time depending on how fast your computer is. Just relax and wait for everything to finish copying over!


