From Zero to Bootable Hero: How to Create a Windows 10 Bootable USB
Unleash the power of creating your own bootable Windows 10 USB drive from scratch and become a tech hero!
Table of Contents
Welcome to our Windows for Dummies blog, where we're all about helping you master everything Windows-related! Today, we're going to walk you through the process of creating a Windows 10 bootable USB drive. Whether you're looking to install Windows 10 on a new computer or need a handy tool for troubleshooting and system recovery, a bootable USB drive is a versatile and essential tool for any Windows user.
Getting Started with Windows Installation and Set-Up
First things first, you'll need a blank USB drive with at least 8GB of storage and a Windows 10 ISO file. If you don't have the ISO file handy, you can download it from the official Microsoft website. Once you have these requirements, follow these steps:
1. Insert your blank USB drive into a USB port on your computer.
2. Download and install a free tool like Rufus, which makes creating bootable USB drives a breeze. Launch Rufus after installation.
3. In Rufus, select your USB drive under the "Device" drop-down menu.
4. Click on the "Select" button next to the boot selection box and navigate to the Windows 10 ISO file you downloaded. Select the file and click "Open."
5. Leave the Partition scheme as "MBR" and File system as "NTFS." Leave the Cluster size as the default setting.
6. Ensure the "Quick Format" and "Create a bootable disk using" options are selected. Make sure the "Standard Windows installation" option is selected in the drop-down menu.
7. Click "Start" to begin creating the bootable USB drive. This process may take some time, so be patient.
Essential Windows Tools and Utilities
Now that you have your Windows 10 bootable USB drive ready, it's important to familiarize yourself with other Essential Windows tools and utilities that can help you navigate your system effectively:
Task Manager is your best friend for managing processes, monitoring performance, and troubleshooting unresponsive programs. To access Task Manager, simply press Ctrl + Shift + Esc on your keyboard.
Windows Defender offers built-in antivirus and antimalware protection to keep your system safe from online threats. Ensure that Windows Defender is up to date and running scans regularly to maintain a secure system.
Windows Media Player is a versatile media player that allows you to play music, videos, and other media files with ease. Simply launch Windows Media Player and drag your files into the player to start enjoying your media collection.
If you're looking to enhance your Windows experience further, consider exploring PowerToys, a set of utilities that add additional features and functionalities to your system. PowerToys can help you customize your desktop, manage windows more efficiently, and improve productivity.
Troubleshooting Common Windows Errors
Despite Windows' user-friendly interface, you may encounter errors like the dreaded Blue Screen of Death (BSOD) or specific error codes like 0x80070643. To troubleshoot these issues effectively, consider the following tips:
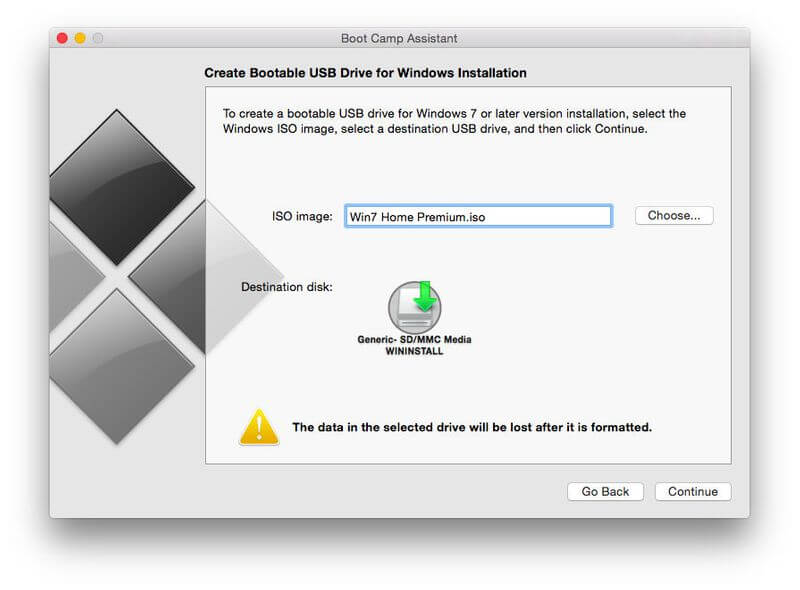
Image courtesy of pdf.wondershare.com via Google Images
Use built-in tools like chkdsk and Robocopy to scan and repair disk errors and recover lost data. These tools can help resolve common disk and file system issues that may be causing system errors.
If you're experiencing network connectivity problems or DNS issues, try resetting your network settings or running network diagnostics to identify and fix the problem. Sometimes, a simple reset can solve connectivity issues quickly.
For users of older Windows versions like XP, Vista, or 7, research specific error messages that may appear and follow troubleshooting steps provided by Microsoft or Windows for Dummies to address these issues effectively.
Advanced Windows Features and Configuration
Ready to take your Windows expertise to the next level? Consider delving into Advanced features and configurations that can enhance your Windows experience:
| Step | Description |
|---|---|
| 1 | Download and install Rufus |
| 2 | Insert a USB flash drive (at least 8GB) |
| 3 | Run Rufus and select your USB drive |
| 4 | Click on the CD/DVD drive icon and select the Windows 10 ISO file |
| 5 | Set the partition scheme to GPT for UEFI or MBR for BIOS |
| 6 | Leave all other settings as default and click Start |
| 7 | Wait for Rufus to create the bootable USB drive |
| 8 | Once finished, you can now boot from the USB drive to install Windows 10 |
Active Directory is a powerful tool for managing user accounts, group policies, and network resources in a corporate environment. Learn how to set up and configure Active Directory to streamline user management and ensure network security.
Hyper-V allows you to create and manage virtual machines on your Windows system, enabling you to run multiple operating systems simultaneously. Experiment with Hyper-V to explore new operating systems or test software in a safe virtual environment.
Windows Subsystem for Linux (WSL) lets you run Linux commands and applications on your Windows system seamlessly. Install WSL and explore the world of Linux without leaving your Windows environment.
Customize your Windows interface with tools like Nexus Dock, Cygwin, and Winaero Tweaker to personalize your desktop, enhance productivity, and make your user experience more enjoyable.
Conclusion
Congratulations, you've successfully mastered the art of creating a Windows 10 bootable USB drive and learned about essential Windows tools, Troubleshooting techniques, and advanced features. With the valuable skills and knowledge gained from this guide, you're well on your way to becoming a Windows expert!
Remember, Windows for Dummies is your go-to resource for all things Windows-related. Explore our blog for more easy how-to guides, FAQs, and expert tips to unlock the full potential of your Windows experience. Keep learning, experimenting, and discovering new ways to maximize your Windows journey!
FAQ
Can I create a Windows 10 bootable USB drive using a Mac?
Unfortunately, Rufus, the tool commonly used to create bootable USB drives, is only available for Windows. However, you can use alternative tools like UNetbootin or Etcher on Mac to achieve a similar result.
Will creating a bootable USB drive delete all the data on my USB?
Yes, creating a bootable USB drive involves formatting the USB, which erases all existing data. Make sure to back up any important files before proceeding with the creation process.
Can I use a USB drive smaller than 8GB for creating a bootable Windows 10 USB?
No, it is recommended to use a USB drive with a minimum capacity of 8GB to ensure that the Windows 10 ISO file fits on the drive. Using a smaller USB drive may result in errors during the creation process.
Is there a way to verify if the bootable USB drive was created successfully?
After creating the bootable USB drive, you can plug it into a computer and set the boot order in BIOS to boot from the USB drive. If you see the Windows installation setup screen, it indicates that the bootable USB drive was created successfully.


