How to Initiate Windows 11 Install?

Discover the step-by-step guide to effortlessly initiate the Windows 11 install process and unlock a new world of features!
Table of Contents
Getting Started with Windows 11 Installation
Is Windows 11 Free to Install?
If you're wondering whether Windows 11 is free, here's the scoop. Windows 11 is a free upgrade for eligible Windows 10 devices. To check if your computer can get this new operating system for free, look for the Windows icon in the bottom right corner of your screen. Click on it to learn more and see if your device qualifies for the upgrade.
What You Need Before Installing
Before diving into the installation process, it's important to ensure that your computer meets the system requirements for Windows 11. These requirements include a compatible processor, a minimum amount of RAM, and sufficient storage space. Additionally, to kick off the installation, you'll need to know where to find the start key on your device. Typically, the start key is located on your keyboard and is represented by the Windows logo.
Preparing for Installation
In order to ensure a smooth transition to Windows 11 on your computer, it is essential to prepare adequately before beginning the installation process. Here are some important steps to take:
Creating a Backup
Before you embark on installing Windows 11, it is crucial to back up all your important files and documents. This way, in case something goes wrong during the installation, you won't lose any valuable data. You can back up your files by saving them to an external hard drive, USB flash drive, or cloud storage.
Getting the Installation Media
To install Windows 11 on your computer, you will need to obtain the necessary installation files. You can do this by downloading the Windows 11 installation files from the official Microsoft website. Once you have the files, you will need to create a bootable USB drive or burn them to a DVD. This will allow you to boot your computer from the USB or DVD and begin the installation process smoothly.
Beginning the Installation Process
When it comes to starting the Windows 11 installation process, you need to follow a few simple steps to ensure a smooth setup. Here's how to get things going:

Image courtesy of via Google Images
Booting from Installation Media
To begin the installation of Windows 11, you first need to boot your computer from the installation media, which can be a USB drive or a DVD. Make sure your computer is turned off, then insert the USB drive or DVD with the Windows 11 installation files.
Next, power on your computer and press the necessary key (often F12 or Del) to enter the boot menu. From there, select the option that corresponds to the installation media you inserted. Your computer will then boot from the USB or DVD, initiating the Windows 11 installation process.
Installation Steps
Once your computer has successfully booted from the installation media, the Windows 11 installation process will begin. Follow the on-screen instructions to select your language, time zone, and keyboard layout.
After setting your preferences, the installation will progress to the next steps, which include selecting the drive where Windows 11 will be installed and agreeing to the terms and conditions. The installation process may take some time, so be patient as Windows 11 gets installed on your computer.
Once the installation is complete, your computer will restart, and you'll be guided through the final steps to set up your user account and configure privacy settings. After completing these final steps, you'll be all set to enjoy the features of Windows 11 on your device!
Installing Windows 11 Step by Step
Before you begin installing Windows 11, you'll need to set your preferences. This includes selecting your language, timezone, keyboard layout, and other settings that will personalize your Windows experience. Make sure to choose the options that suit you best for a smooth installation process.
Completing the Windows 11 Setup
Once you've set your preferences, you will proceed to complete the Windows 11 setup. This involves creating a user account that will be used to log into your new Windows system. You will also be prompted to choose privacy settings that determine how your data is shared with Microsoft. Follow the on-screen instructions to finish the installation process.
| Step | Description |
|---|---|
| 1 | Check System Requirements |
| 2 | Backup Important Data |
| 3 | Download Windows 11 Installer |
| 4 | Run the Installer |
| 5 | Follow Installation Prompts |
| 6 | Reboot Your Computer |
Troubleshooting Common Installation Issues
If you encounter an issue where Windows 11 won't start during the installation process, don't worry! Here are a few things you can try:
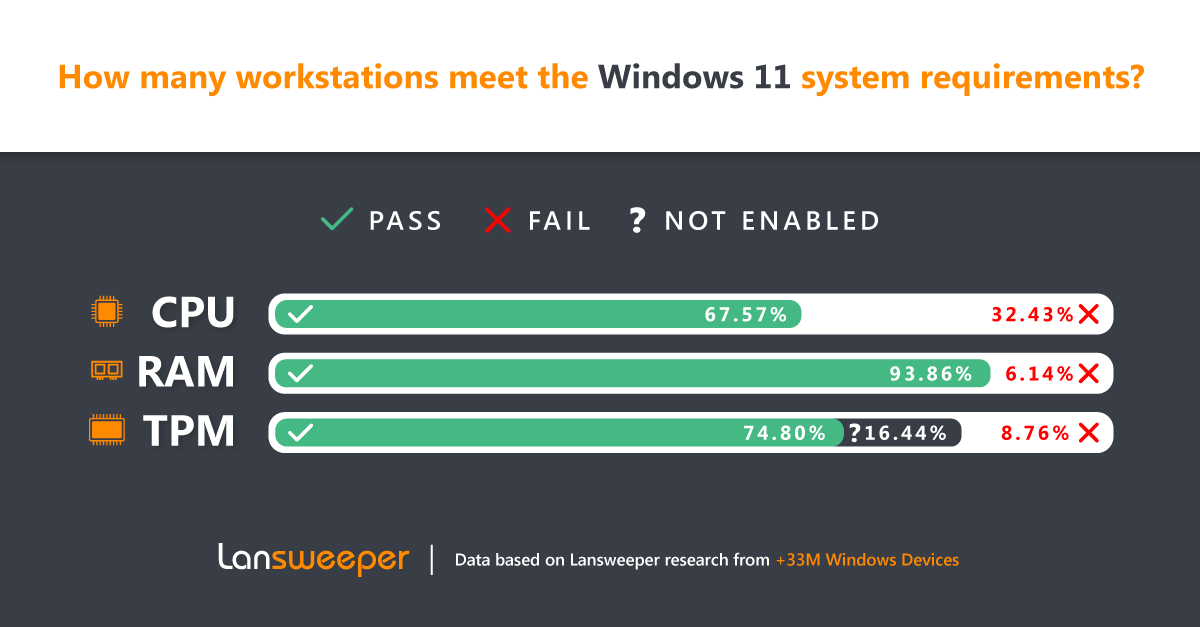
Image courtesy of via Google Images
1. Check your computer's compatibility with Windows 11. Make sure your device meets all the system requirements for the new operating system.
2. Restart your computer. Sometimes a simple reboot can resolve the problem and allow the installation process to continue smoothly.
3. Disconnect any external devices. Sometimes peripherals like USB drives or external hard drives can interfere with the installation process. Unplug them and try again.
4. Run the Windows Update Troubleshooter. This tool can help identify and resolve any issues that may be preventing the installation of Windows 11.
Where to Seek Further Help
If you've tried the above steps and still can't get Windows 11 to start installing, don't panic. There are resources available to help you troubleshoot the problem:
1. Visit the official Microsoft support website. Here, you can find helpful articles, forums, and troubleshooting tools to assist you in getting Windows 11 up and running.
2. Contact Microsoft Support. If you still can't resolve the issue on your own, reach out to Microsoft's support team for personalized assistance with your installation problem.
By following these troubleshooting tips and seeking additional help if needed, you'll be well on your way to successfully installing Windows 11 on your computer.
Conclusion: Enjoying Your New Windows 11
Now that you have successfully installed Windows 11 on your computer, get ready to unlock a whole new world of exciting features and improvements! The process might have seemed a bit daunting at first, but you did it, and now you can enjoy the benefits of this latest operating system.
With Windows 11, you'll experience a modern and streamlined interface that is designed to enhance your productivity and creativity. From the new Start menu and taskbar to the improved gaming capabilities and multitasking features, Windows 11 offers a seamless and enjoyable user experience.
Take some time to explore the various apps and settings available in Windows 11. Customize your desktop, set up your favorite apps, and make the most of the advanced tools at your disposal. Whether you're a student, professional, or gamer, Windows 11 has something for everyone.
Remember to keep your system updated regularly to ensure you have the latest security patches and performance enhancements. By staying current with updates, you can ensure that your Windows 11 experience remains smooth and efficient.
So, get ready to dive into the world of Windows 11 and make the most of your new operating system. Whether you're working on a school project, connecting with friends online, or enjoying your favorite games, Windows 11 is here to make your computing experience better than ever before.
FAQs
Can my PC handle Windows 11?
If you're wondering whether your computer can run Windows 11, there are a few things to consider. Windows 11 has specific system requirements that your PC must meet to ensure a smooth installation and operation of the new software. You can check if your computer is compatible with Windows 11 by visiting the official Microsoft website and looking at the minimum hardware specifications. If your PC falls within the required parameters, you should be able to enjoy the benefits of Windows 11 without any issues.
How long does it take to install Windows 11?
The time it takes to install Windows 11 can vary depending on several factors, such as the speed of your computer, the type of storage device you're using, and any custom settings you choose during the installation process. On average, it can take anywhere from 20 minutes to an hour to complete the installation of Windows 11. However, it's essential to be patient and allow the installation process to finish without interruption to avoid any potential issues.
Do I lose my files when I install Windows 11?
When installing Windows 11, you have the option to keep your files and personal data or perform a clean installation that will remove everything from your computer. If you choose to keep your files, Windows 11 will upgrade your existing operating system while preserving your documents, photos, and other important data. However, it's always recommended to back up your files before starting the installation process to prevent any accidental data loss. By creating a backup, you can ensure that your information is safe and secure throughout the installation of Windows 11.

