Install Windows 10 Like a Pro!

Discover the insider secrets to installing Windows 10 like a pro and say goodbye to tech headaches for good!
Table of Contents
Introduction: Get Ready to Install Windows 10 Pro!
Welcome to the exciting world of Windows 10 Pro! Are you ready to dive into the process of installing this amazing operating system on your computer? In this section, we will guide you through the steps you need to take to bring Windows 10 Pro to life on your device. Let's get started!
Windows 10 Pro is the latest version of the popular Microsoft Windows operating system. It comes packed with exciting features and improvements that will enhance your computing experience. Whether you're a student, a professional, or just someone who loves to explore new technology, Windows 10 Pro has something for everyone.
Before we jump into the installation process, let's make sure you have everything you need. You'll need your Windows 10 Pro license key, a Windows PC, and a bootable USB drive with the Windows 10 setup files. Don't worry if you're not sure how to get these ready – we'll walk you through it step by step. Let's make sure you're all set up and ready to go!
Gather Your Tools
Before you begin installing Windows 10 Pro on your computer, you will need a special code called a license key. This key is like a secret password that unlocks all the features of Windows 10 Pro. To find your Windows 10 Pro license key, check the email or box where you received your Windows 10 Pro software. If you bought it online, you might find the key in your account settings. Make sure to keep this key safe because you'll need it during the installation process.
Creating a Windows 10 Bootable USB
To install Windows 10 Pro on your computer, you will need a special tool called a bootable USB drive. This is like a magic wand that helps your computer understand how to install Windows 10 Pro. Don't worry, creating a bootable USB drive is easier than it sounds! All you need is a blank USB drive with enough storage space and a special software tool that can turn the USB drive into a magical installation helper. Follow the steps carefully, and soon you'll be ready to start the installation process!
Starting Up the Installer
Now that you have your Windows 10 bootable USB ready, it's time to start the installation process. Follow these steps to begin setting up Windows 10 Pro on your PC.
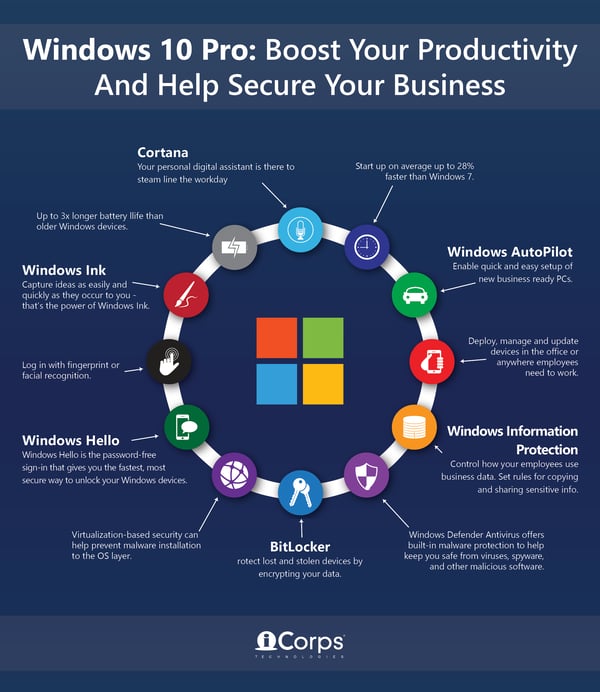
Image courtesy of blog.icorps.com via Google Images
Setting Up Your PC to Boot from USB
Before you can install Windows 10 Pro from your bootable USB drive, you need to make sure your computer is set up to boot from it. This involves accessing your computer's BIOS (Basic Input/Output System) settings. When you power on your PC, you'll need to press a specific key – often F2, F12, or Del – to enter the BIOS.
Once inside the BIOS, look for the Boot menu and change the boot order to prioritize the USB drive. Save your changes and exit the BIOS. Now, when you restart your computer with the bootable USB inserted, it should boot from the USB drive to start the Windows 10 Pro installation process.
Navigating the Windows 10 Setup
After your PC boots from the USB drive, you will see the Windows 10 setup screen. Follow the on-screen instructions to proceed with the installation. You may be prompted to choose your preferred language, time format, and keyboard layout.
Next, you'll need to click on "Install Now" to begin installing Windows 10 Pro. You may be asked to enter your Windows 10 Pro license key at this stage. Make sure to have it handy if required. Follow the prompts to select the installation type – whether you're doing an upgrade or a clean install.
During the installation process, your PC may restart multiple times. This is normal, so don't worry if it happens. Just let the installation process complete, and soon you'll be ready to set up your new Windows 10 Pro system.
Installing Windows 10 Pro
Now that you have prepared your tools and set up your computer to boot from the USB, it's time to dive into the installation process of Windows 10 Pro. Follow these steps carefully to ensure a smooth installation experience.
Choosing the Right Installation Type
Before you begin the actual installation, you need to decide whether you want to upgrade from an existing version of Windows or perform a clean install of Windows 10 Pro. An upgrade will keep your files and programs intact, while a clean install will start fresh. Make your choice based on your needs.
Partitioning Your Hard Drive
During the installation process, you will be prompted to select where you want to install Windows 10 Pro. If you are performing a clean install, you may need to create or allocate space on your hard drive for the new operating system. Follow the on-screen instructions to partition your hard drive correctly.
Finalizing the Installation
Once you have chosen the installation type and partitioned your hard drive, the setup process will proceed. Windows 10 Pro will begin installing, and you will need to follow the prompts to complete the installation. Ensure that you do not interrupt the process and let it finish to avoid any issues.
Setting Up Your Windows 10 Pro
After successfully installing Windows 10 Pro on your PC, it's time to set it up for your personal use. Here are some essential steps to get you started with your brand new operating system.
| Step | Details |
|---|---|
| Step 1 | Download the Windows 10 ISO file from the official Microsoft website. |
| Step 2 | Create a bootable USB drive using software like Rufus or Windows Media Creation Tool. |
| Step 3 | Backup your important files and data before starting the installation process. |
| Step 4 | Insert the bootable USB drive into the computer and restart your system. |
| Step 5 | Follow the on-screen instructions to install Windows 10, choosing your preferred settings. |
| Step 6 | Complete the installation process and update your drivers and software for optimal performance. |

Image courtesy of techcommunity.microsoft.com via Google Images
Creating a User Account
Once you boot into Windows 10 Pro for the first time, you will be prompted to create a user account. This account will be unique to you and will allow you to personalize your settings, save files, and customize your experience on the computer. Follow the on-screen instructions to create your account, including selecting a username and password.
Adjusting Your Settings
After setting up your user account, it's time to adjust your settings to make Windows 10 Pro work best for you. Click on the Start menu in the bottom left corner of the screen and then select the gear icon for "Settings." Here, you can customize your desktop background, manage your display settings, set up your Wi-Fi connection, and personalize your experience with themes and colors.
Conclusion: Ready to Use Windows 10 Pro!
Now that you've successfully installed Windows 10 Pro on your PC, you're ready to dive into all the amazing features this operating system has to offer!
With Windows 10 Pro, you'll experience improved performance, enhanced security features, and a user-friendly interface that makes navigating your PC a breeze.
Exploring Windows 10 Pro
Take some time to explore the different apps and tools that come with Windows 10 Pro. From the Start Menu to the Microsoft Store, there's a world of possibilities waiting for you to discover.
Customizing Your Experience
Don't forget to personalize your Windows 10 Pro experience by adjusting settings such as desktop backgrounds, screen brightness, and sound preferences to make your PC truly your own.
Staying Up to Date
It's important to keep your Windows 10 Pro system updated with the latest security patches and feature updates. This ensures that your PC runs smoothly and remains protected from potential threats.
By following these tips and making the most of your Windows 10 Pro installation, you'll be well on your way to enjoying a seamless and productive computing experience.
FAQs: Questions You Might Have
What if My PC Doesn't Boot from the USB?
If your computer doesn't boot from the USB drive, don't worry! First, double-check that you properly set up the boot order in your BIOS. If that's all correct and it still doesn't work, try using a different USB port or re-creating the bootable USB drive. Sometimes, there may be compatibility issues with certain USB drives, so you might need to try a different one.
Can I Upgrade from Windows 7 or 8 to Windows 10 Pro?
Absolutely! You can upgrade from Windows 7 or 8 to Windows 10 Pro. To do this, you'll need to download the Windows 10 Media Creation Tool from the Microsoft website. Follow the instructions provided by the tool to upgrade your operating system. Just make sure your PC meets the minimum system requirements for Windows 10 Pro.
How Do I Activate My Windows 10 Pro After Installation?
Activating your Windows 10 Pro is simple. Once the installation is complete, go to Settings > Update & Security > Activation, and enter your Windows 10 Pro license key. This key is usually provided when you purchase a copy of Windows 10 Pro. After entering the key, your Windows 10 Pro will be activated, and you can enjoy all the features of this powerful operating system!
Generated by Texta.ai Blog Automation


