Make Win 10 USB: Bootable Guide
Unleash the power of Win 10 with our step-by-step guide to creating a bootable USB drive. Say goodbye to technical headaches!
Table of Contents
Welcome, young tech enthusiast! Today we're going to dive into the exciting world of making a bootable USB for Windows 10. But before we jump into the how-to, let's understand why creating a bootable USB for Windows 10 is important and what it is used for.
What is a Bootable USB?
A bootable USB is like a magic wand for your computer. It's a special USB drive that holds all the necessary tools to start up your computer and even install or repair Windows 10. It's like having a superhero cape for your PC!
Why You Might Need One
Imagine your computer is feeling a bit under the weather and needs a fresh start. That's where a bootable USB for Windows 10 comes to the rescue! It can help you fix pesky problems or even install Windows 10 from scratch. It's your computer's trusty sidekick in times of trouble.
Requirements Before You Start
Choosing the Right Version of Windows 10
Before you begin creating a bootable USB for Windows 10, you need to decide which version of Windows 10 you want to install. There are two main versions: Windows 10 Home and Windows 10 Pro. Windows 10 Home is suitable for most users, while Windows 10 Pro has additional features designed for businesses and advanced users.
Materials Needed
In order to create a bootable USB for Windows 10, you will need a few essential items. Firstly, you'll need a USB flash drive with enough storage capacity to hold the Windows installation files. Make sure the USB drive is at least 8GB in size to accommodate all the necessary data.
Additionally, you'll require a computer that runs on a Windows operating system. This computer will be used to download the required software and transfer the installation files to the USB drive. Having these materials ready will ensure a smooth and successful process of creating your bootable Windows 10 USB.
Creating Your Bootable USB Step-by-Step
In this section, we will guide you through the process of creating your very own Windows 10 bootable USB step by step. By following these instructions carefully, you will have a handy tool to install or repair your Windows 10 operating system whenever needed.
Downloading the Necessary Software
The first step in creating a bootable USB for Windows 10 is to download the required software. You will need to get your hands on a program that can help you transfer the Windows 10 installation files onto your USB drive. There are several free tools available online, such as Rufus or Windows USB/DVD Download Tool, that can assist you in this process.
Preparing the USB Drive
Once you have downloaded the necessary software, it's time to prepare your USB drive. Insert the USB flash drive into your computer and ensure that there are no important files on it, as the formatting process will erase all data. Open the software you downloaded and follow the instructions to format the USB drive properly for the bootable installation files.
Transferring Windows 10 Files
After formatting your USB drive, you can now transfer the Windows 10 installation files onto it. The software you downloaded earlier will have an option to select the Windows 10 ISO file that you downloaded from the official Microsoft website. Follow the program's instructions to copy the files onto your USB drive, making it bootable with Windows 10.
Testing Your Bootable USB
Once you have created your Windows 10 bootable USB drive, it's essential to test it to ensure it works correctly before you actually need to use it in an emergency. Here, we'll walk you through the process of testing your bootable USB.
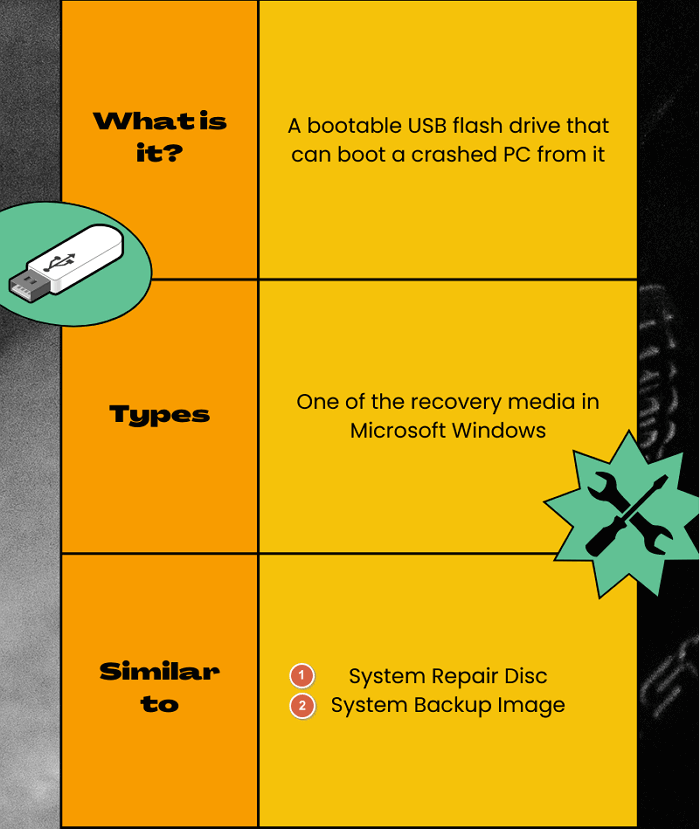
Image courtesy of www.easeus.com via Google Images
Initial Testing
To verify that your bootable USB is functioning properly, you need to boot your computer from it. Insert the USB drive into a USB port on your computer and restart the system. While the computer is booting up, you may need to access the BIOS settings (usually by pressing a key like F2 or Del) to set the USB drive as the primary boot device. Save the changes and exit the BIOS settings, allowing the computer to restart.
| Step | Instructions |
|---|---|
| Step 1 | Download the Windows 10 ISO file from the official Microsoft website. |
| Step 2 | Insert a USB drive with at least 8GB of storage capacity into your computer. |
| Step 3 | Download and install a USB bootable software like Rufus or Etcher. |
| Step 4 | Open the USB bootable software and select the Windows 10 ISO file you downloaded. |
| Step 5 | Choose the USB drive as the destination for the bootable Windows 10 installation. |
| Step 6 | Click on the 'Start' or 'Create' button to begin the process of making the USB bootable. |
| Step 7 | Wait for the software to finish creating the bootable USB drive. |
| Step 8 | Once the process is complete, safely eject the USB drive from your computer. |
| Step 9 | Your Windows 10 USB is now ready for use as a bootable drive for installation or troubleshooting. |
If everything is set up correctly, your computer should boot from the USB drive instead of the internal hard drive. You may see a Windows logo or a loading screen indicating that the USB drive is working as intended.
Troubleshooting
If your computer doesn't boot from the USB drive or encounters any errors, there are a few common issues and solutions you can try:
- Make sure the USB drive is properly inserted into the USB port and that the port is functioning.
- Check if the BIOS settings are correctly configured to boot from the USB drive.
- Recreate the bootable USB using the same process to ensure there were no errors during creation.
- If using a different computer, ensure that it supports booting from a USB drive.
By following these troubleshooting steps, you should be able to identify and resolve most issues with your bootable USB drive. Once you confirm that the USB is working correctly, you can rely on it to install or repair Windows 10 whenever needed.
Using Your Bootable USB
Now that you have your bootable USB ready, you can use it to install Windows 10 on your computer. Here's how you can do it:
1. First, insert the bootable USB drive into a USB port on your computer.
2. Start or restart your computer. During the startup process, you'll need to press a specific key (usually F2, F12, or Del) to enter the BIOS settings. Look for the boot order settings in the BIOS.
3. In the boot order settings, select the USB drive as the primary boot device. Save the changes and exit the BIOS.
4. Your computer will now boot from the USB drive. Follow the on-screen instructions to begin the Windows 10 installation process.
Repairing Windows
If your Windows 10 setup is not working correctly and you need to repair it, you can also use the bootable USB for that. Here's how:
1. Insert the bootable USB drive into a USB port on your computer.
2. Start or restart your computer. Enter the BIOS settings by pressing the designated key during startup.
3. In the BIOS, set the USB drive as the primary boot device and save the changes.
4. Your computer will boot from the USB. Instead of proceeding with a fresh installation, you can choose the repair option to fix any issues with your existing Windows 10 setup.
By following these simple steps, you can either install Windows 10 on your computer from the bootable USB or repair any issues you may encounter with your current Windows setup. Having a Windows 10 bootable USB handy can be a lifesaver in various situations!
Conclusion
In conclusion, creating a Windows 10 bootable USB can be a valuable resource for installing or repairing your Windows 10 operating system. Whether you're a home user or a professional requiring specific features, having a bootable USB can save you time and effort in critical situations. By following the step-by-step guide outlined in this article, you can easily create your own bootable USB and ensure that you're prepared for any unexpected events that may arise.
Image courtesy of www.easeus.com via Google Images
Remember, the key to a successful bootable USB creation lies in choosing the right version of Windows 10 and ensuring you have all the necessary materials handy. Testing your bootable USB once it's created is crucial to avoid any potential issues during installation or repair. And once you have your bootable USB ready, you can confidently use it to install Windows 10 on a new system or repair existing installations that are causing problems.
With this guide, you have the tools and knowledge to create your own Windows 10 bootable USB, empowering you to take control of your system's maintenance and installation processes. By mastering this skill, you can become more self-reliant when it comes to managing your Windows 10 operating system, saving time and hassle in the long run.
FAQs
Can I create a Windows 10 bootable USB on a Mac?
Unfortunately, creating a Windows 10 bootable USB on a Mac can be a bit tricky. The official Microsoft tool for creating bootable drives, called Media Creation Tool, is only available for Windows computers. However, there are alternative methods that may work using third-party software solutions. It's recommended to follow specific guides online that cater to creating a Windows bootable USB on a Mac for a successful outcome.
How much space do I need on my USB drive for a bootable Windows 10?
You will need a USB drive with a minimum of 8 GB of space to create a bootable Windows 10 USB. It's important to ensure that you have enough space on the drive to accommodate all the necessary installation files. Using a larger capacity USB drive, like a 16 GB or 32 GB drive, can provide additional room for updates and other files, if needed.
Do I need a Windows 10 product key to use the bootable USB?
Creating a bootable USB for Windows 10 does not require a product key. The key is typically used during the installation process of Windows 10 to activate the software. However, if you are reinstalling Windows 10 on a device that previously had it activated, the system may automatically recognize the hardware and reactivate without requiring a product key again. But it's always a good idea to have your product key handy, just in case it's needed during the installation process.
Generated by Texta.ai Blog Automation


