Set Up Active Directory in Win 11

Discover the step-by-step guide to setting up Active Directory in Windows 11 and optimize your system's user management capabilities.
Table of Contents
Introduction to Active Directory on Windows 11
Active Directory is like a digital organizer for computers, helping to keep everything in order on a network. It's super important for businesses and organizations to manage their computers and users efficiently. In this guide, we will focus on setting up Active Directory specifically on Windows 11 Pro.
Windows 11 Pro is a special version of Microsoft Windows designed for professional use, making it perfect for setting up and managing networks. By the end of this guide, you'll be a pro at using Active Directory on your Windows 11 Pro system.
Getting Ready for Active Directory
Before diving into setting up Active Directory on Windows 11 Pro, there are a few things you need to prepare. Let's go through the essential steps to get everything ready.
Check Windows 11 Pro Version
First things first, you need to make sure that you are running Windows 11 Pro on your computer. To check this, simply click on the Start menu, then go to Settings > System > About. Under Windows specifications, you should see which edition of Windows 11 you have installed. If it says Windows 11 Pro, then you are good to go!
Understand Windows Server
Windows Server plays a crucial role in setting up Active Directory. It is the server operating system from Microsoft designed for running network services like Active Directory. You will need access to a Windows Server to create and manage your Active Directory domains, users, and computers.
Installing Active Directory
In this section, we will walk through the process of installing Active Directory on a Windows Server, which is essential for managing networks.

Image courtesy of techcommunity.microsoft.com via Google Images
Set Up on Windows Server 2022
When setting up Active Directory, the first step is to install it on a Windows Server 2022. The latest server version provides improved security and performance, making it ideal for Network management.
To begin, ensure you have administrative access to the Windows Server. Then, follow these steps:
- Open the Server Manager by clicking on the Start button and selecting it from the menu.
- In the Server Manager window, click on "Manage" and then select "Add Roles and Features."
- Click "Next" on the Before you begin screen and choose "Role-based or feature-based installation" on the Installation Type screen.
- Select the appropriate server from the server pool or specify a different one if needed.
- Check the box next to "Active Directory Domain Services" when prompted to select server roles.
- Complete the installation by following the on-screen instructions, including any additional features required for Active Directory.
- Once the installation is complete, you will need to configure Active Directory to set up your network domain.
By following these steps, you will successfully install Active Directory on Windows Server 2022, laying the foundation for efficient network management.
Configuring Active Directory
Configuring Active Directory is an essential step in managing networks efficiently. Once Active Directory is set up on Windows Server, you can start managing user accounts and computer settings in your network domain.
Create User Accounts
Creating user accounts in Active Directory allows you to control who has access to the network resources. To add a user account, you need to open the Active Directory Users and Computers tool on the Windows Server. From there, you can click on 'New' and select 'User' to create a new user account. Enter the user's details like name, username, and password to set up their account.
Manage Computer Accounts
Managing computer accounts in Active Directory is important for organizing and controlling computers within your network. To add a computer to the domain, you need to join it to the Active Directory domain. This allows you to manage and apply group policies to the computer centrally. To add a computer, go to the System properties on the Windows computer, click on 'Change settings,' then 'Change,' and enter the domain name provided by your network administrator.
By configuring user and computer accounts in Active Directory, you can streamline network management and enhance security by controlling user access and permissions effectively.
Connecting Windows 11 to Active Directory
So, you've set up Active Directory on your Windows Server and now it's time to connect your Windows 11 Pro computer to the domain. This process allows your computer to be part of the network and access resources controlled by Active Directory.
| Step | Description |
|---|---|
| 1 | Open the Settings app in Windows 11. |
| 2 | Go to "Accounts" and select "Access work or school." |
| 3 | Click on "Connect" and choose "Join this device to a local Active Directory domain." |
| 4 | Enter the domain name and credentials provided by your network administrator. |
| 5 | Follow the on-screen instructions to complete the setup process. |
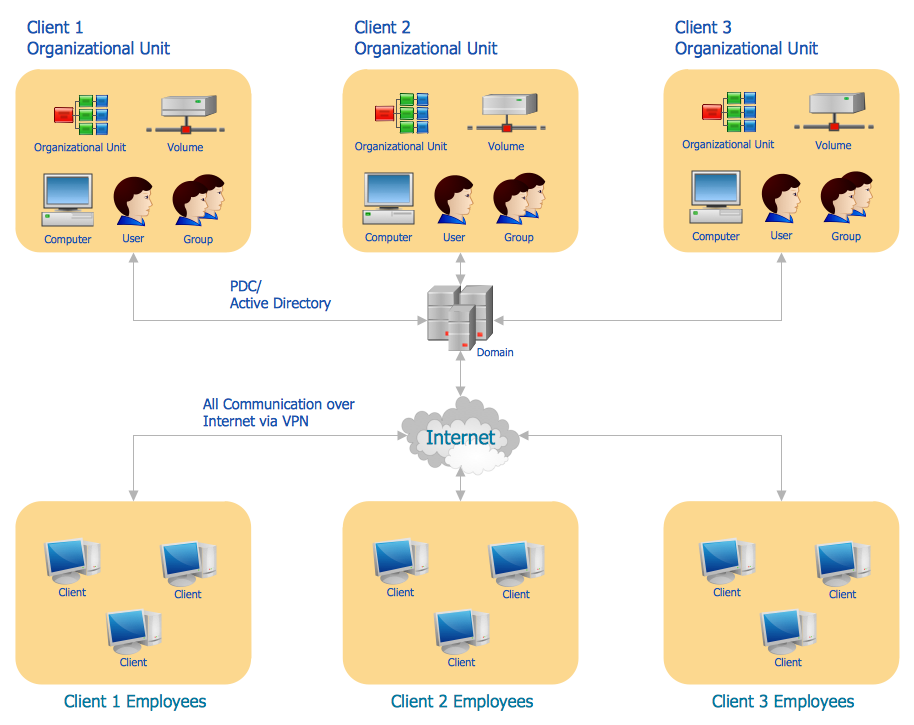
Image courtesy of www.conceptdraw.com via Google Images
Joining the Domain
To join a Windows 11 Pro machine to an Active Directory domain, follow these simple steps:
- On your Windows 11 Pro computer, open the Settings app by clicking on the Start menu and selecting the gear icon.
- In the Settings window, navigate to Accounts.
- Click on Access work or school on the left-hand side.
- Next, click on Connect under Access work or school.
- Choose Join this device to a local Active Directory domain.
- Enter the domain name provided by your network administrator and click Next.
- Input your Active Directory credentials when prompted.
- Once authenticated, you'll see a message confirming your computer is now connected to the domain.
After completing these steps, you should now be able to log in to your Windows 11 Pro computer using your Active Directory credentials. This integration enables centralized user management, enhanced security, and streamlined access to network resources.
Troubleshooting Common Issues
As you set up Active Directory on your Windows 11 Pro system, you may encounter some common issues. Here are some Troubleshooting tips to help you navigate through potential roadblocks:
Connectivity Issues
If you are having trouble connecting your computer to the Active Directory domain, try the following steps:
1. Check your network connection to ensure it is stable and active.
2. Verify that your computer's network settings are correctly configured to connect to the domain.
3. Restart your computer and try joining the domain again.
Permission Errors
Permission errors can sometimes occur when accessing Active Directory. Here's how you can troubleshoot and resolve them:
1. Ensure that your user account has the necessary permissions to access the Active Directory services.
2. Check if there are any group policy restrictions that might be blocking your access.
3. Try logging in with a different user account with higher privileges to see if the issue persists.
By following these troubleshooting tips, you can address common issues that may arise during the setup of Active Directory on your Windows 11 Pro system.
Conclusion
In conclusion, setting up Active Directory on Windows 11 Pro is a crucial step in efficiently managing networks and user accounts. By following the steps outlined in this guide, you can seamlessly establish a network domain and connect your Windows 11 Pro computer to the Active Directory server. Remember, Active Directory simplifies network administration and enhances security by centralizing user and computer management.
Image courtesy of www.microsoft.com via Google Images
For further learning and troubleshooting, do not hesitate to explore additional resources provided by Microsoft or seek assistance from IT professionals. Stay curious and continue to expand your knowledge of networking and system management to excel in the digital world of today!
Frequently Asked Questions (FAQs)
Can I use Active Directory on Windows 11 Home edition?
Active Directory is a powerful tool designed for professional network management and is therefore only available on Windows 11 Pro and higher editions. Unfortunately, it is not supported on the Home edition of Windows 11. If you are looking to utilize Active Directory, you will need to upgrade to Windows 11 Pro.
Do I need internet access to use Active Directory?
No, you do not need constant internet access to use Active Directory. Active Directory primarily operates within your local network environment, providing centralized management of users and resources without reliance on an internet connection. However, internet access may be required for certain features or functionalities that rely on external services or updates.


