Set Up Windows 10 Bootable USB
Unlock the secrets of creating a Windows 10 bootable USB in minutes - your ticket to ultimate tech efficiency!
Table of Contents
Introduction to Bootable USB Drives
Have you ever heard of a bootable USB drive? It may sound like a fancy term, but it's actually a super helpful tool for your Windows PC. Imagine having a special key that can unlock your computer and fix any problems it might be having – that's exactly what a bootable USB drive does!
What is a Bootable USB?
A bootable USB drive is like a magic wand for your computer. It's a small device that acts as a key to starting or 'booting' your computer's Windows operating system. When you plug in a bootable USB drive and start your computer, it tells your PC to use the files on the USB to launch Windows.
Why Do You Need One?
Now, you might be wondering, why would you need a bootable USB drive? Well, imagine your computer refuses to start up properly – it keeps showing error messages or getting stuck. In cases like these, a bootable USB drive can swoop in to save the day. It can help you repair your Windows or even reinstall it if needed.
Preparation Before Creating Your Bootable USB
Before you start creating your bootable USB, make sure you know whether your Windows PC needs Windows 10 Home or Windows 10 Professional. This step is important because the version you choose should match the one that was originally installed on your computer.
Gathering the Necessary Tools
Another crucial aspect before creating your bootable USB is having the right tools from Sysinternals. These tools are essential for the process and ensure that your USB drive is created correctly. Make sure to gather all the necessary tools before moving forward with the creation process.
Creating Your Windows 10 Bootable USB Step-by-Step
In this section, we will go through the process of creating your Windows 10 bootable USB so that you can easily install or repair Windows on your PC. Follow these step-by-step instructions carefully to ensure a successful setup.
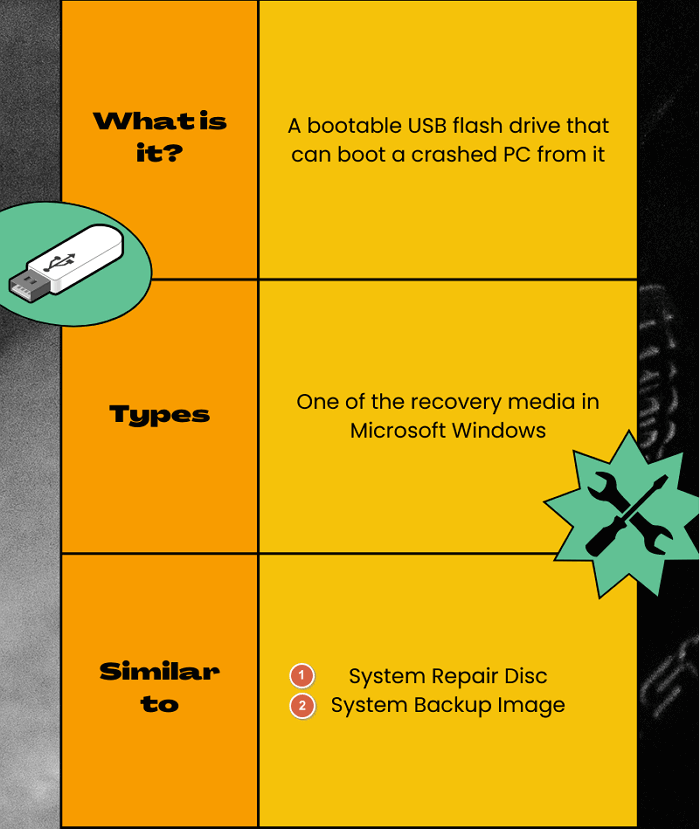
Image courtesy of www.easeus.com via Google Images
Downloading the Windows 10 Installation File
The first step in creating your bootable USB is to download the Windows 10 installation file. You can get this file from the official Microsoft website. Make sure to choose the correct version of Windows 10 that matches your system requirements.
Formatting Your USB Drive
Before you can start using your USB drive to install Windows, you need to format it. Formatting a USB drive prepares it by removing any existing data and making it compatible with the Windows installation process. This step ensures that the USB drive is clean and ready to receive the necessary files.
Using the Tool to Create the Bootable USB
Now that your USB drive is formatted, you will need to use a special tool to create the bootable USB. There are several software programs available for this task, such as Rufus or Windows USB/DVD Download Tool. These tools will guide you through the process of transferring the Windows 10 installation files onto your USB drive correctly.
Testing Your Windows 10 Bootable USB
So, you've created your Windows 10 bootable USB drive, but how do you know if it will work when you need it? Let's find out how to test it on a Windows PC, like the Microsoft Surface 4, to make sure everything is in order.
How to Boot from the USB
To test your bootable USB, you'll need to start up your computer using the USB drive instead of the usual Windows that's already on your PC. Here's how you can do it:
- Insert the bootable USB into a USB port on your computer.
- Restart your computer.
- During the restarting process, look for a message that says something like "Press F12 for Boot Menu" or "Press Del for BIOS Setup."
- Press the key indicated on the screen to enter the Boot Menu or BIOS Setup.
- In the Boot Menu or BIOS Setup, look for an option to boot from a USB device and select it.
- Follow the prompts to start your computer using the bootable USB drive.
Troubleshooting Common Issues
Sometimes, even after following the steps above, you may encounter some issues with your bootable USB. Here are a few common problems and how you can troubleshoot them:
| Step | Description |
|---|---|
| 1 | Download Windows 10 ISO file from official website |
| 2 | Insert a USB flash drive (minimum 8GB) into your computer |
| 3 | Download and install a tool like Rufus or Windows USB/DVD Download Tool |
| 4 | Open the tool and select the Windows 10 ISO file you downloaded |
| 5 | Choose the USB drive you inserted as the destination for the bootable USB |
| 6 | Click on "Start" to begin creating the Windows 10 bootable USB |
| 7 | Wait for the process to complete and safely eject the USB drive |
| 8 | Your Windows 10 bootable USB is ready to use for installing or repairing Windows 10 |
- USB not recognized: Try plugging the USB into a different port on your computer. Sometimes, certain ports may not work properly.
- Error messages during boot: If you see error messages during the boot process, double-check that you created the bootable USB correctly with the necessary files.
- Slow booting: If your computer is taking a long time to boot from the USB, it could be due to the speed of the USB drive. Try using a different, faster USB drive.
By testing your Windows 10 bootable USB on a Windows PC like the Microsoft Surface 4 and troubleshooting any issues that arise, you can ensure that it will work smoothly when you need it the most.
Keeping Your Bootable USB Safe
After creating your bootable USB, it's essential to store it in a safe place. You should keep it in a secure location where it won't get lost or damaged. Avoid leaving it lying around where it could be misplaced or potentially exposed to physical harm. Consider using a protective case or container to keep your USB drive safe from dust, moisture, or physical impact.
Image courtesy of www.easeus.com via Google Images
Updating Your USB with New Windows Versions
As Windows releases updates and new versions, it's important to keep your bootable USB drive current. By updating your USB with the latest Windows version, you ensure that it remains effective and capable of properly booting your computer when needed. Regularly check for updates and follow the necessary steps to upgrade your bootable USB with the most recent Windows files.
Conclusion: Ready to Boot!
We've covered a lot of ground about creating a Windows 10 bootable USB, and you're now equipped with the knowledge to tackle this task with ease. Whether you are using a Microsoft Surface 4 or any other Windows PC, having a bootable USB can be a lifesaver when you need to install or repair your operating system.
Key Takeaways
By now, you understand the significance of a bootable USB drive and why it's essential to have one handy for your Windows PC. This powerful tool serves as a key to get your computer up and running when traditional methods fail.
Final Thoughts
With the step-by-step instructions provided in this guide, you can confidently create your Windows 10 bootable USB without any hassle. Remember to store it in a safe place, keep it updated with new Windows versions, and always test it out to ensure it's working correctly.
Empowered for the Future
Armed with this newfound knowledge, you are now ready to take on the challenge of creating a Windows 10 bootable USB whenever the need arises. Whether you're a tech-savvy enthusiast or a casual user, having this tool in your arsenal will undoubtedly come in handy!
Frequently Asked Questions (FAQs)
Can I use the bootable USB on different computers?
We'll talk about whether you can use the same USB to help out on other computers, not just your own.
How do I know if my USB is bootable?
We'll explain how you can be sure your USB is ready to use when you need to boot your PC.
What if my bootable USB isn't working?
Don’t worry, we’ll suggest some steps you can try if your USB doesn’t seem to be working right.