Upgrade to Windows 11: A Guide

Looking to take your computer to the next level? Find out everything you need to know about upgrading to Windows 11.
Table of Contents
Introduction: Ready for a Cool New Windows?
Hey there, tech enthusiasts! Are you all set to dive into the world of Windows 11? Today, we're going to uncover the reasons why switching from Windows 10 to the brand-new Windows 11 is a fantastic idea. So, let's buckle up and get ready for an exciting adventure into the realm of innovative technology!
Windows 11 has taken the tech world by storm with its sleek design and enhanced features. If you're someone who loves exploring new possibilities and pushing the boundaries of what your computer can do, then upgrading to Windows 11 might just be the perfect move for you.
Join us as we delve into the world of Windows 11, discover its benefits, and learn how this cool new operating system can elevate your computing experience to a whole new level. So, grab your favorite snack, get comfy, and let's get started on this thrilling journey to Windows 11!
Why Upgrade to Windows 11?
Are you ready to dive into the cool world of Windows 11? Let's explore why upgrading from Windows 10 to the latest Windows 11 might be a fantastic idea.
Awesome New Features
Windows 11 is packed with awesome new features that will make your computer experience more exciting than ever. From a fresh new Start menu design to improved multitasking capabilities, there's a lot to love about Windows 11!
Speed and Performance
Have you ever wished your computer could run faster and smoother? With Windows 11, you might just get your wish granted. This new operating system is designed to enhance the speed and performance of your device, giving you a snappier and more efficient computing experience.
Security Improvements
Keeping your computer safe from viruses and hackers is crucial. Windows 11 comes with enhanced security features to provide better protection for your device. With stronger security measures in place, you can browse the internet and use your computer with peace of mind.
Making Sure Your Computer Is Ready
Before you can enjoy all the cool new features of Windows 11, you need to make sure your computer is ready for the upgrade. Let's go through the essential steps to ensure a smooth transition.
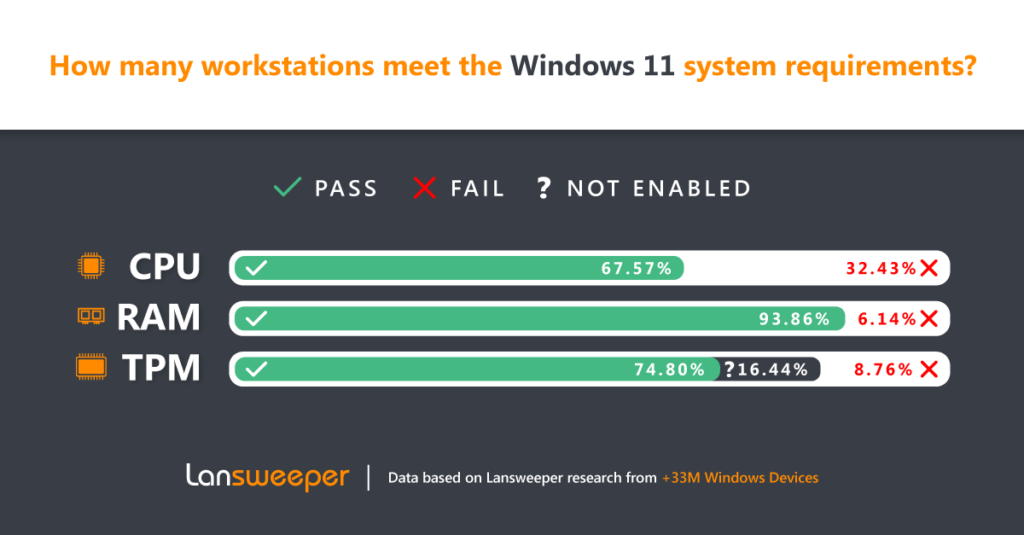
Image courtesy of www.lansweeper.com via Google Images
System Requirements
Windows 11 comes with a set of system requirements that your computer needs to meet in order to run the new operating system smoothly. Some of the key requirements include a compatible processor, a certain amount of RAM, and ample storage space. Checking your computer's specifications against these requirements will help you determine if it can handle Windows 11.
Checking Compatibility
To check if your computer is compatible with Windows 11, Microsoft has provided a convenient tool called the PC Health Check. This tool can assess your system's capabilities and let you know if it meets the necessary criteria for upgrading to Windows 11. Running this check will give you a clear answer on whether your computer can be friends with Windows 11 or not.
How to Get Windows 11
Here's how to actually get Windows 11 onto your computer. Think of it like getting a new game to play.
Using Windows Update
If you're ready to make the switch to Windows 11, the easiest way to do so is through Windows Update. This is a built-in feature of Windows that helps you keep your system up to date with the latest software.
To check for and install Windows 11 updates, follow these simple steps:
- Click on the Start button and select Settings.
- In the Settings window, click on Update & Security.
- Click on Windows Update in the left sidebar, then click Check for updates.
- If Windows 11 is available for your computer, you'll see an option to download and install it. Click on that and follow the on-screen instructions.
Creating a Bootable USB
If you prefer a more hands-on approach to upgrading your computer, you can also create a bootable USB drive to install Windows 11. Follow these steps to create a bootable USB:
- Insert a USB flash drive with at least 8GB of storage into your computer.
- Download the Windows 11 installation tool from the official Microsoft website.
- Run the installation tool and follow the on-screen instructions to create the bootable USB drive.
- Once the bootable USB drive is ready, restart your computer and boot from the USB drive to begin the installation process.
By following these steps, you'll be on your way to enjoying all the exciting new features of Windows 11 in no time!
Step-by-Step Installation Guide
Now comes the exciting part - installing Windows 11 on your computer! Follow these simple steps to give your PC a fresh new look:
1. Make sure to save all your important files and close any open programs before you begin the installation process.
2. If you're upgrading from Windows 10, you can do so by going to Settings > Update & Security > Windows Update. Look for the option to upgrade to Windows 11 and follow the on-screen instructions. Your computer will restart a few times during the installation process.
3. If you prefer using a bootable USB to upgrade to Windows 11, you'll need to create one using the Windows 11 installation media tool. Insert a USB drive into your computer and follow the prompts to create the bootable USB. Once it's ready, restart your computer and boot from the USB drive to start the installation process.
4. Follow the on-screen instructions to select your preferences, such as language, time zone, and keyboard layout. Make sure to read and accept the license terms before proceeding.
5. Choose whether you want to keep your files and apps or do a clean installation. Keeping your files and apps will preserve your data, while a clean installation will erase everything on your computer.
6. Sit back and relax while Windows 11 is installed on your computer. This process may take some time, depending on your computer's speed and the installation method you chose.
What to Do After Installation
After successfully installing Windows 11, there are a few more steps to take to ensure everything is working smoothly:
| Step | Description |
|---|---|
| 1 | Check system requirements |
| 2 | Backup important data |
| 3 | Download Windows 11 Upgrade Assistant |
| 4 | Run Upgrade Assistant and follow prompts |
| 5 | Check for compatibility issues |
| 6 | Proceed with upgrade process |
1. Check for updates: Make sure to check for any additional updates after installing Windows 11 to ensure you have the latest features and security patches.
2. Customize your settings: Take some time to personalize your computer by adjusting settings such as desktop background, theme, and screen resolution to make Windows 11 feel like your own.
3. Install your favorite apps: Reinstall any apps or programs you were using on your previous operating system to make your computer ready for everyday use.
4. Enjoy Windows 11: Explore the new features and improvements that Windows 11 has to offer. Take your time to discover all the exciting changes and enhancements that come with the latest operating system.
Troubleshooting Common Issues
Upgrading to Windows 11 can be a smooth process, but sometimes you might encounter a few bumps along the way. Here are some common issues that you might face and how to troubleshoot them:
Image courtesy of www.netsupportsoftware.com via Google Images
Installation Errors
If you see an error message during the installation process, don't panic! It's common to run into a few hiccups. Here's what you can do:
1. Check your internet connection: Make sure you're connected to a stable internet connection to prevent any interruptions during the installation.
2. Restart your computer: Sometimes a simple restart can fix the issue. Shut down your computer, power it back on, and try installing Windows 11 again.
3. Run the Windows Update Troubleshooter: Windows has a built-in tool that can help diagnose and fix issues with Windows Update. Go to Settings > Update & Security > Troubleshoot to run the tool.
Post-Upgrade Problems
After upgrading to Windows 11, you might encounter some issues with certain features not working correctly. Here's how you can troubleshoot common post-upgrade problems:
1. Update your drivers: Make sure all your device drivers are up to date. You can do this by going to Device Manager, right-clicking on each device, and selecting "Update driver."
2. Check for software compatibility: Some programs may not be fully compatible with Windows 11. Check with the software developers for any updates or patches that can resolve compatibility issues.
3. Perform a clean installation: If all else fails, consider doing a clean installation of Windows 11. This will remove all previous settings and start fresh, potentially resolving any lingering issues.
By following these troubleshooting tips, you can resolve common issues that may arise during the upgrade process and ensure a smooth transition to Windows 11.
Conclusion: Welcome to the Future with Windows 11
As we wrap up our journey into the exciting realm of Windows 11, we hope you're feeling ready to take on the future with this amazing operating system. A whole new world of possibilities awaits you, and Windows 11 is your ticket to exploring it all. Let's recap some of the key points we've covered to help you dive into this new era of computing.
Why Windows 11 Rocks
Windows 11 isn't just any old software upgrade – it's a game-changer. With awesome new features that amp up your creativity and productivity, Windows 11 is designed to make your digital life smoother and more enjoyable. From a sleek new design to improved performance and enhanced security features, Windows 11 has it all.
Getting Ready for Windows 11
Before you make the switch to Windows 11, it's crucial to ensure your computer meets the system requirements. Checking compatibility and readiness is key to a seamless upgrade experience. So, be sure to run those checks to guarantee a smooth transition to Windows 11.
Upgrading to Windows 11
When the time comes to upgrade, you have options. Whether it's through Windows Update or creating a bootable USB, the process is straightforward and can be done with ease. Just follow the steps, and you'll soon be enjoying all that Windows 11 has to offer.
Now that you're on the verge of diving into the future with Windows 11, remember that a new beginning comes with its own set of possibilities and adventures. Embrace the change, explore the new features, and make the most out of your Windows 11 experience. Welcome to the future – welcome to Windows 11!
FAQs: Curious Questions You Might Have
Can my computer run Windows 11?
If you're excited about Windows 11, you might be wondering if your computer can handle it. To check if your computer is ready for the upgrade, you should look at the system requirements. These are like a checklist that your computer needs to meet in order to run Windows 11 smoothly. Make sure to check things like your processor, memory (RAM), and storage space to see if your computer is up to the task!
Is Windows 11 free?
The big question on everyone's mind - is Windows 11 going to cost you an arm and a leg? Well, the good news is that if you already have Windows 10, you might be able to get Windows 11 for free! Microsoft has said that some Windows 10 users will be eligible for a free upgrade to Windows 11. So, keep an eye out for any announcements about when and how you can get your hands on Windows 11 without breaking the bank.
How long does it take to install Windows 11?
When you're ready to upgrade to Windows 11, you might be wondering how much time you'll need to set aside for the installation process. The time it takes to install Windows 11 can vary depending on your computer and internet speed, but on average, it can take anywhere from 20 minutes to an hour or more. So, make sure you have some free time set aside and maybe a snack or two to enjoy while you wait for Windows 11 to work its magic!
Generated by Texta.ai Blog Automation


